![[New] 2024 Approved Unveiling the Techniques for Autoplay YouTube Videos on FB](https://thmb.techidaily.com/c01f488742f525379e15c90538d56863d279883606cc35ff29b3863a4d78b16e.jpg)
"[New] 2024 Approved Unveiling the Techniques for Autoplay YouTube Videos on FB"
Unveiling the Techniques for Autoplay YouTube Videos on FB
Facebook Video Maker - Wondershare Filmora
Provide abundant video effects - A creative video editor
Powerful color correction and grading
Detailed tutorials provided by the official channel
Our social lives have shifted almost completely to social media apps, where we tend to share anything and everything with our friends and family. We often find ourselves in a situation where we see something funny or interesting on YouTube and immediately want to share it on our Facebook.
We can easily share YouTube videos on Facebook. Here is the complete guide on sharing youtube videos on Facebook.
However, when you share something from YouTube to Facebook, it adds an embed link, and the video does not support autoplay on Facebook.
So, to help you avoid that problem, we will give you a step-by-step guide in this article.
In this article
Part 1: Can I Play YouTube Videos Automatically on Facebook?
Part 2: How to Turn Facebook Video Autoplay On/Off?
Part 1: Can I Play YouTube Videos Automatically on Facebook?
The YouTube videos that you share on Facebook do not play automatically. Facebook does not give the privilege to YouTube to play videos on their platform.
Thus, when you share a YouTube video on Facebook, it shows in the form of a link instead of a video player.
Now the question is, what can you do?
There are two ways you can go about in order to enable the autoplay feature for your YouTube videos.
### First MethodThe first method that we will introduce here is for those who have a YouTube channel of their own and want to transfer their videos from YouTube to Facebook and enable autoplay.
The unfortunate thing is that YouTube does not have a feature that allows you to share videos as videos instead of an embed link. So, we look at third-party apps for help.
One of such third-party apps is TubeBuddy. It is an amazing app for YouTube Channel Management that we will use here to solve our little problem.
We will now provide you with a step-by-step guide for uploading your YouTube videos to Facebook with the help of TubeBuddy.
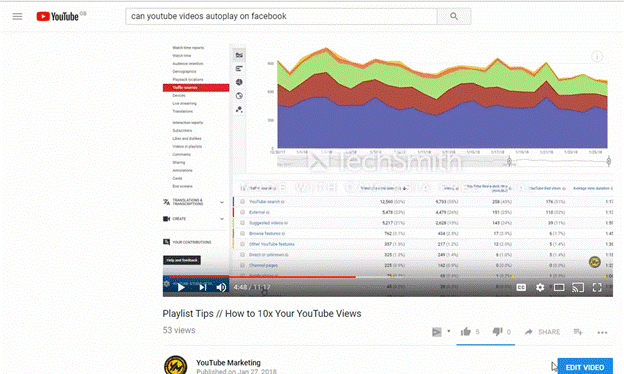
Step 1: Go to your YouTube Channel
The first step is to go to your YouTube channel and select the video you want to share.

Step 2: Go to the TubeBuddy Dropdown Menu
Click on the TubeBuddy Dropdown menu. You will see a lot of different tabs here.
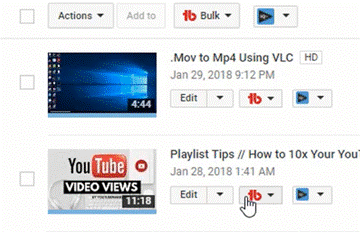
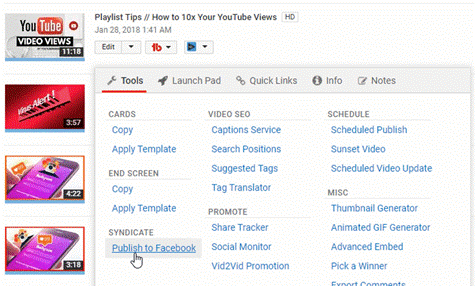
Step 3: Look for the Syndicate Option
In the drop-down menu, look for the Syndicate tab. Under it, click on “Publish to Facebook” to transfer the video to your Facebook page.
Step 4: Set the Desired Settings
A dialog box will appear where you can enter your Facebook account, set the title, adjust the description, set the publish time, and set the thumbnail.
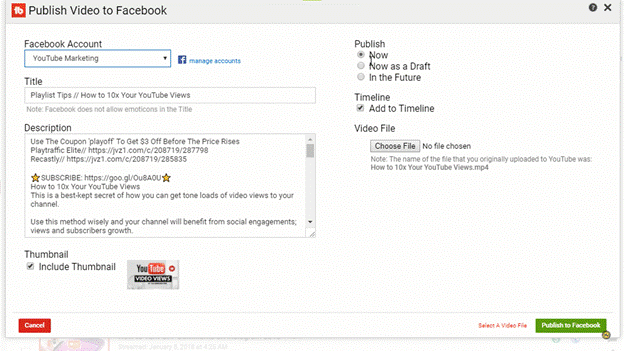
Once you are done, click on “Publish to Facebook,” and voila!
Now, your YouTube video will be uploaded on your Facebook page as a video and will play automatically as the rest of the Facebook videos do.
Second Method
The second method of ensuring the autoplay feature works with your videos is to upload them directly from your computer. You can also download videos from YouTube using third-party services and then upload them on Facebook.
The step-by-step guide is given below.
Step 1: Search and Open the Video
Go to YouTube, search for the video you want to share on Facebook, and open it.
Step 2: Copy the URL
At the top of the page, copy the URL of the page.
Step 3: Use Any Third-Party Service
Some different third-party apps and websites help you convert and download YouTube videos. Just a quick Google search will help you out with finding one.
Paste the URL in the app or website. Then download the video.
Step 4: Upload the Video to Facebook.
Once you have the video on your computer, go to Facebook. On the home page, you will see an option to upload a Photo/Video below the status bar.
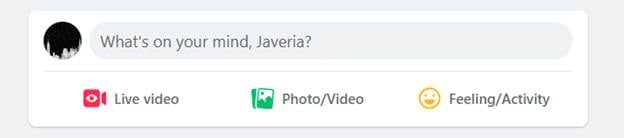
Click on it, select the video you want to upload, and then post it.
Note:
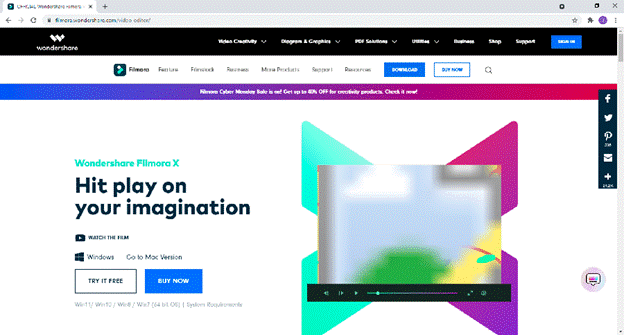
You can use this particular method for uploading any video that you have on your computer. You can enhance and give a professional look to your videos by using Wondershare Filmora and then uploading them to Facebook.
You may be thinking that your video can’t be as good as the YouTube videos. Still, with the multitude of features that Wondershare Filmora provides, your videos will surely match the level if not outshine the rest of the YouTube videos.
What is Wondershare Filmora?
Wondershare Filmora is a video editing tool created by Wondershare. It is an extensive but simple to use tool which enables you to create top-class professional videos and films. The best part is that it has a free version that you can use to try out its different features and then decide for yourself.

Some of the features it offers are mentioned below:
Audio Ducking: Filmora offers this feature so that you can narrate your voice consistently over other sounds on the track. It helps in creating a very realistic environment for the audience.
Green Screen: Most of the scenes we see in movies are a result of this feature. It allows you to add any background to your video, e.g., you can even show the sun exploding. Filmora offers this feature as well.
Color Grading: FIlmora also offers a diverse color palette that you can use to color grade your videos and films. You can emphasize the visual tone and atmosphere of the video and make it look more cinematic.
These are just a few features of Wondershare Filmora. It has so much more to offer, so go to Wondershare’s website and download it right now!
Part 2. How to Turn Facebook Video Autoplay On/Off?
Facebook has recently introduced the Autoplay feature where the video starts playing automatically even if you don’t click on it. This feature helps by showing you what the video is about without having to click on it specifically.
Step-by-Step Guide for Mobile Users
In order to enable this feature on your mobile, follow these few simple steps given below.
Step 1: Open Facebook.
Go to the home screen of your phone and tap on the Facebook app to launch it.
Step 2: Go to the Menu
On your screen, you will see a Menu Icon. If you are an Android user, you will see this icon in the top right corner, and if you are an iPhone user, you will see this icon in the bottom right corner.
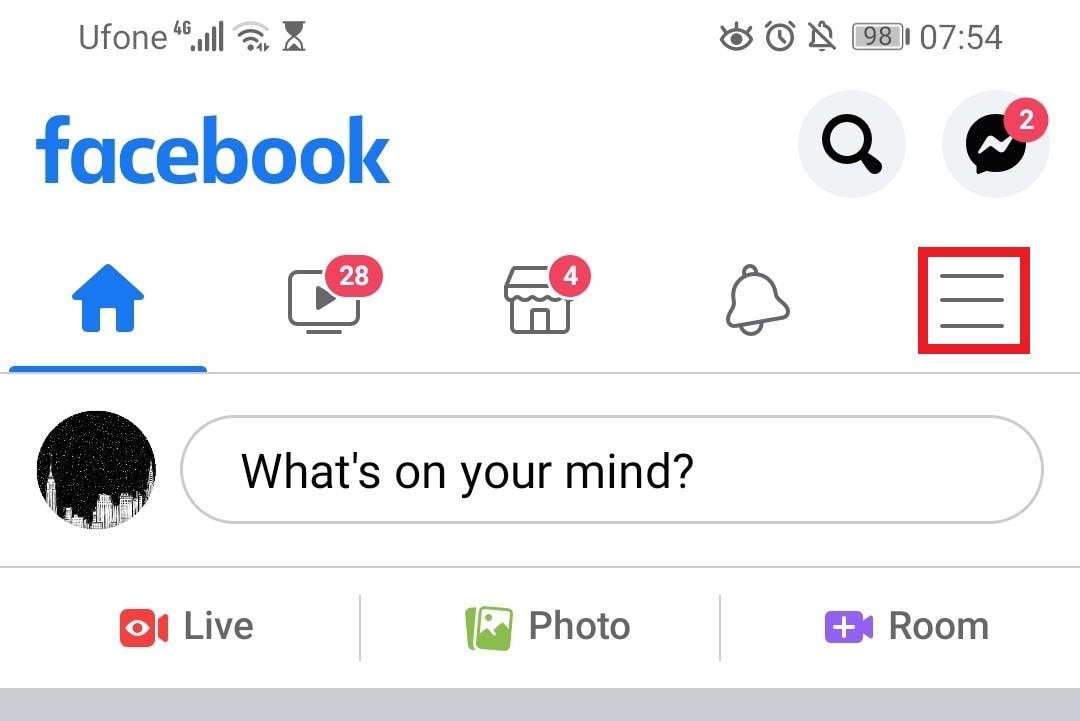
Tap on it to see further options.
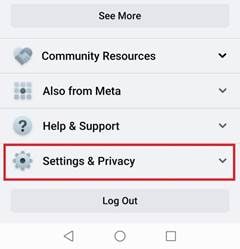
Step 3: Go to Settings
Once you are in the menu, tap on “Settings & Privacy.” Then tap on “Settings.”
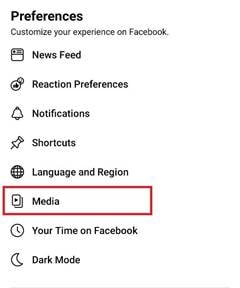
Step 4: Select “Media”
Now, from the Preferences list, click on “Media” to customize your Autoplay settings.
Step 5: Set the Desired Autoplay Settings
Here, you will see three different options for your Autoplay settings. Check the box of either “On Mobile Data and Wi-Fi” or “On Wi-Fi Only” in order to enable the autoplay.
Your videos will now play automatically on your News Feed.
If you wish to turn the autoplay feature off, simply check the “Never Autoplay Videos” box.
Conclusion
Facebook’s Autoplay feature is a great feature for viewers as well as content creators. It allows viewers to get a glimpse of what the idea is about, and on the other hand, it acts as a default preview from the content creator’s point of view.
In this article, different methods and techniques have been mentioned which you can use to enable or disable the Autoplay feature for your YouTube or other videos that you upload on to Facebook.
We hope it helps!
Our social lives have shifted almost completely to social media apps, where we tend to share anything and everything with our friends and family. We often find ourselves in a situation where we see something funny or interesting on YouTube and immediately want to share it on our Facebook.
We can easily share YouTube videos on Facebook. Here is the complete guide on sharing youtube videos on Facebook.
However, when you share something from YouTube to Facebook, it adds an embed link, and the video does not support autoplay on Facebook.
So, to help you avoid that problem, we will give you a step-by-step guide in this article.
In this article
Part 1: Can I Play YouTube Videos Automatically on Facebook?
Part 2: How to Turn Facebook Video Autoplay On/Off?
## Part 1: Can I Play YouTube Videos Automatically on Facebook?The YouTube videos that you share on Facebook do not play automatically. Facebook does not give the privilege to YouTube to play videos on their platform.
Thus, when you share a YouTube video on Facebook, it shows in the form of a link instead of a video player.
Now the question is, what can you do?
There are two ways you can go about in order to enable the autoplay feature for your YouTube videos.
First Method
The first method that we will introduce here is for those who have a YouTube channel of their own and want to transfer their videos from YouTube to Facebook and enable autoplay.
The unfortunate thing is that YouTube does not have a feature that allows you to share videos as videos instead of an embed link. So, we look at third-party apps for help.
One of such third-party apps is TubeBuddy. It is an amazing app for YouTube Channel Management that we will use here to solve our little problem.
We will now provide you with a step-by-step guide for uploading your YouTube videos to Facebook with the help of TubeBuddy.
Step 1: Go to your YouTube Channel
The first step is to go to your YouTube channel and select the video you want to share.
Step 2: Go to the TubeBuddy Dropdown Menu
Click on the TubeBuddy Dropdown menu. You will see a lot of different tabs here.
Step 3: Look for the Syndicate Option
In the drop-down menu, look for the Syndicate tab. Under it, click on “Publish to Facebook” to transfer the video to your Facebook page.
Step 4: Set the Desired Settings
A dialog box will appear where you can enter your Facebook account, set the title, adjust the description, set the publish time, and set the thumbnail.
Once you are done, click on “Publish to Facebook,” and voila!
Now, your YouTube video will be uploaded on your Facebook page as a video and will play automatically as the rest of the Facebook videos do.
Second Method
The second method of ensuring the autoplay feature works with your videos is to upload them directly from your computer. You can also download videos from YouTube using third-party services and then upload them on Facebook.
The step-by-step guide is given below.
Step 1: Search and Open the Video
Go to YouTube, search for the video you want to share on Facebook, and open it.
Step 2: Copy the URL
At the top of the page, copy the URL of the page.
Step 3: Use Any Third-Party Service
Some different third-party apps and websites help you convert and download YouTube videos. Just a quick Google search will help you out with finding one.
Paste the URL in the app or website. Then download the video.
Step 4: Upload the Video to Facebook.
Once you have the video on your computer, go to Facebook. On the home page, you will see an option to upload a Photo/Video below the status bar.
Click on it, select the video you want to upload, and then post it.
Note:
You can use this particular method for uploading any video that you have on your computer. You can enhance and give a professional look to your videos by using Wondershare Filmora and then uploading them to Facebook.
You may be thinking that your video can’t be as good as the YouTube videos. Still, with the multitude of features that Wondershare Filmora provides, your videos will surely match the level if not outshine the rest of the YouTube videos.
What is Wondershare Filmora?
Wondershare Filmora is a video editing tool created by Wondershare. It is an extensive but simple to use tool which enables you to create top-class professional videos and films. The best part is that it has a free version that you can use to try out its different features and then decide for yourself.
Some of the features it offers are mentioned below:
Audio Ducking: Filmora offers this feature so that you can narrate your voice consistently over other sounds on the track. It helps in creating a very realistic environment for the audience.
Green Screen: Most of the scenes we see in movies are a result of this feature. It allows you to add any background to your video, e.g., you can even show the sun exploding. Filmora offers this feature as well.
Color Grading: FIlmora also offers a diverse color palette that you can use to color grade your videos and films. You can emphasize the visual tone and atmosphere of the video and make it look more cinematic.
These are just a few features of Wondershare Filmora. It has so much more to offer, so go to Wondershare’s website and download it right now!
Part 2. How to Turn Facebook Video Autoplay On/Off?
Facebook has recently introduced the Autoplay feature where the video starts playing automatically even if you don’t click on it. This feature helps by showing you what the video is about without having to click on it specifically.
Step-by-Step Guide for Mobile Users
In order to enable this feature on your mobile, follow these few simple steps given below.
Step 1: Open Facebook.
Go to the home screen of your phone and tap on the Facebook app to launch it.
Step 2: Go to the Menu
On your screen, you will see a Menu Icon. If you are an Android user, you will see this icon in the top right corner, and if you are an iPhone user, you will see this icon in the bottom right corner.
Tap on it to see further options.
Step 3: Go to Settings
Once you are in the menu, tap on “Settings & Privacy.” Then tap on “Settings.”

Step 4: Select “Media”
Now, from the Preferences list, click on “Media” to customize your Autoplay settings.
Step 5: Set the Desired Autoplay Settings
Here, you will see three different options for your Autoplay settings. Check the box of either “On Mobile Data and Wi-Fi” or “On Wi-Fi Only” in order to enable the autoplay.
Your videos will now play automatically on your News Feed.
If you wish to turn the autoplay feature off, simply check the “Never Autoplay Videos” box.
Conclusion
Facebook’s Autoplay feature is a great feature for viewers as well as content creators. It allows viewers to get a glimpse of what the idea is about, and on the other hand, it acts as a default preview from the content creator’s point of view.
In this article, different methods and techniques have been mentioned which you can use to enable or disable the Autoplay feature for your YouTube or other videos that you upload on to Facebook.
We hope it helps!
Our social lives have shifted almost completely to social media apps, where we tend to share anything and everything with our friends and family. We often find ourselves in a situation where we see something funny or interesting on YouTube and immediately want to share it on our Facebook.
We can easily share YouTube videos on Facebook. Here is the complete guide on sharing youtube videos on Facebook.
However, when you share something from YouTube to Facebook, it adds an embed link, and the video does not support autoplay on Facebook.
So, to help you avoid that problem, we will give you a step-by-step guide in this article.
In this article
Part 1: Can I Play YouTube Videos Automatically on Facebook?
Part 2: How to Turn Facebook Video Autoplay On/Off?

Part 1: Can I Play YouTube Videos Automatically on Facebook?
The YouTube videos that you share on Facebook do not play automatically. Facebook does not give the privilege to YouTube to play videos on their platform.
Thus, when you share a YouTube video on Facebook, it shows in the form of a link instead of a video player.
Now the question is, what can you do?
There are two ways you can go about in order to enable the autoplay feature for your YouTube videos.
First Method
The first method that we will introduce here is for those who have a YouTube channel of their own and want to transfer their videos from YouTube to Facebook and enable autoplay.
The unfortunate thing is that YouTube does not have a feature that allows you to share videos as videos instead of an embed link. So, we look at third-party apps for help.
One of such third-party apps is TubeBuddy. It is an amazing app for YouTube Channel Management that we will use here to solve our little problem.
We will now provide you with a step-by-step guide for uploading your YouTube videos to Facebook with the help of TubeBuddy.
Step 1: Go to your YouTube Channel
The first step is to go to your YouTube channel and select the video you want to share.
Step 2: Go to the TubeBuddy Dropdown Menu
Click on the TubeBuddy Dropdown menu. You will see a lot of different tabs here.
Step 3: Look for the Syndicate Option
In the drop-down menu, look for the Syndicate tab. Under it, click on “Publish to Facebook” to transfer the video to your Facebook page.
Step 4: Set the Desired Settings
A dialog box will appear where you can enter your Facebook account, set the title, adjust the description, set the publish time, and set the thumbnail.
Once you are done, click on “Publish to Facebook,” and voila!
Now, your YouTube video will be uploaded on your Facebook page as a video and will play automatically as the rest of the Facebook videos do.
Second Method
The second method of ensuring the autoplay feature works with your videos is to upload them directly from your computer. You can also download videos from YouTube using third-party services and then upload them on Facebook.
The step-by-step guide is given below.
Step 1: Search and Open the Video
Go to YouTube, search for the video you want to share on Facebook, and open it.
Step 2: Copy the URL
At the top of the page, copy the URL of the page.
Step 3: Use Any Third-Party Service
Some different third-party apps and websites help you convert and download YouTube videos. Just a quick Google search will help you out with finding one.
Paste the URL in the app or website. Then download the video.
Step 4: Upload the Video to Facebook.
Once you have the video on your computer, go to Facebook. On the home page, you will see an option to upload a Photo/Video below the status bar.
Click on it, select the video you want to upload, and then post it.
Note:
You can use this particular method for uploading any video that you have on your computer. You can enhance and give a professional look to your videos by using Wondershare Filmora and then uploading them to Facebook.
You may be thinking that your video can’t be as good as the YouTube videos. Still, with the multitude of features that Wondershare Filmora provides, your videos will surely match the level if not outshine the rest of the YouTube videos.
What is Wondershare Filmora?
Wondershare Filmora is a video editing tool created by Wondershare. It is an extensive but simple to use tool which enables you to create top-class professional videos and films. The best part is that it has a free version that you can use to try out its different features and then decide for yourself.
Some of the features it offers are mentioned below:
Audio Ducking: Filmora offers this feature so that you can narrate your voice consistently over other sounds on the track. It helps in creating a very realistic environment for the audience.
Green Screen: Most of the scenes we see in movies are a result of this feature. It allows you to add any background to your video, e.g., you can even show the sun exploding. Filmora offers this feature as well.
Color Grading: FIlmora also offers a diverse color palette that you can use to color grade your videos and films. You can emphasize the visual tone and atmosphere of the video and make it look more cinematic.
These are just a few features of Wondershare Filmora. It has so much more to offer, so go to Wondershare’s website and download it right now!
Part 2. How to Turn Facebook Video Autoplay On/Off?
Facebook has recently introduced the Autoplay feature where the video starts playing automatically even if you don’t click on it. This feature helps by showing you what the video is about without having to click on it specifically.
Step-by-Step Guide for Mobile Users
In order to enable this feature on your mobile, follow these few simple steps given below.
Step 1: Open Facebook.
Go to the home screen of your phone and tap on the Facebook app to launch it.
Step 2: Go to the Menu
On your screen, you will see a Menu Icon. If you are an Android user, you will see this icon in the top right corner, and if you are an iPhone user, you will see this icon in the bottom right corner.
Tap on it to see further options.
Step 3: Go to Settings
Once you are in the menu, tap on “Settings & Privacy.” Then tap on “Settings.”
Step 4: Select “Media”
Now, from the Preferences list, click on “Media” to customize your Autoplay settings.
Step 5: Set the Desired Autoplay Settings
Here, you will see three different options for your Autoplay settings. Check the box of either “On Mobile Data and Wi-Fi” or “On Wi-Fi Only” in order to enable the autoplay.
Your videos will now play automatically on your News Feed.
If you wish to turn the autoplay feature off, simply check the “Never Autoplay Videos” box.
Conclusion
Facebook’s Autoplay feature is a great feature for viewers as well as content creators. It allows viewers to get a glimpse of what the idea is about, and on the other hand, it acts as a default preview from the content creator’s point of view.
In this article, different methods and techniques have been mentioned which you can use to enable or disable the Autoplay feature for your YouTube or other videos that you upload on to Facebook.
We hope it helps!
Our social lives have shifted almost completely to social media apps, where we tend to share anything and everything with our friends and family. We often find ourselves in a situation where we see something funny or interesting on YouTube and immediately want to share it on our Facebook.
We can easily share YouTube videos on Facebook. Here is the complete guide on sharing youtube videos on Facebook.
However, when you share something from YouTube to Facebook, it adds an embed link, and the video does not support autoplay on Facebook.
So, to help you avoid that problem, we will give you a step-by-step guide in this article.
In this article
Part 1: Can I Play YouTube Videos Automatically on Facebook?
Part 2: How to Turn Facebook Video Autoplay On/Off?
Part 1: Can I Play YouTube Videos Automatically on Facebook?
The YouTube videos that you share on Facebook do not play automatically. Facebook does not give the privilege to YouTube to play videos on their platform.
Thus, when you share a YouTube video on Facebook, it shows in the form of a link instead of a video player.
Now the question is, what can you do?
There are two ways you can go about in order to enable the autoplay feature for your YouTube videos.
First Method
The first method that we will introduce here is for those who have a YouTube channel of their own and want to transfer their videos from YouTube to Facebook and enable autoplay.
The unfortunate thing is that YouTube does not have a feature that allows you to share videos as videos instead of an embed link. So, we look at third-party apps for help.
One of such third-party apps is TubeBuddy. It is an amazing app for YouTube Channel Management that we will use here to solve our little problem.
We will now provide you with a step-by-step guide for uploading your YouTube videos to Facebook with the help of TubeBuddy.
Step 1: Go to your YouTube Channel
The first step is to go to your YouTube channel and select the video you want to share.

Step 2: Go to the TubeBuddy Dropdown Menu
Click on the TubeBuddy Dropdown menu. You will see a lot of different tabs here.
Step 3: Look for the Syndicate Option
In the drop-down menu, look for the Syndicate tab. Under it, click on “Publish to Facebook” to transfer the video to your Facebook page.
Step 4: Set the Desired Settings
A dialog box will appear where you can enter your Facebook account, set the title, adjust the description, set the publish time, and set the thumbnail.
Once you are done, click on “Publish to Facebook,” and voila!
Now, your YouTube video will be uploaded on your Facebook page as a video and will play automatically as the rest of the Facebook videos do.
Second Method
The second method of ensuring the autoplay feature works with your videos is to upload them directly from your computer. You can also download videos from YouTube using third-party services and then upload them on Facebook.
The step-by-step guide is given below.
Step 1: Search and Open the Video
Go to YouTube, search for the video you want to share on Facebook, and open it.
Step 2: Copy the URL
At the top of the page, copy the URL of the page.
Step 3: Use Any Third-Party Service
Some different third-party apps and websites help you convert and download YouTube videos. Just a quick Google search will help you out with finding one.
Paste the URL in the app or website. Then download the video.
Step 4: Upload the Video to Facebook.
Once you have the video on your computer, go to Facebook. On the home page, you will see an option to upload a Photo/Video below the status bar.
Click on it, select the video you want to upload, and then post it.
Note:
You can use this particular method for uploading any video that you have on your computer. You can enhance and give a professional look to your videos by using Wondershare Filmora and then uploading them to Facebook.
You may be thinking that your video can’t be as good as the YouTube videos. Still, with the multitude of features that Wondershare Filmora provides, your videos will surely match the level if not outshine the rest of the YouTube videos.
What is Wondershare Filmora?
Wondershare Filmora is a video editing tool created by Wondershare. It is an extensive but simple to use tool which enables you to create top-class professional videos and films. The best part is that it has a free version that you can use to try out its different features and then decide for yourself.
Some of the features it offers are mentioned below:
Audio Ducking: Filmora offers this feature so that you can narrate your voice consistently over other sounds on the track. It helps in creating a very realistic environment for the audience.
Green Screen: Most of the scenes we see in movies are a result of this feature. It allows you to add any background to your video, e.g., you can even show the sun exploding. Filmora offers this feature as well.
Color Grading: FIlmora also offers a diverse color palette that you can use to color grade your videos and films. You can emphasize the visual tone and atmosphere of the video and make it look more cinematic.
These are just a few features of Wondershare Filmora. It has so much more to offer, so go to Wondershare’s website and download it right now!
Part 2. How to Turn Facebook Video Autoplay On/Off?
Facebook has recently introduced the Autoplay feature where the video starts playing automatically even if you don’t click on it. This feature helps by showing you what the video is about without having to click on it specifically.
Step-by-Step Guide for Mobile Users
In order to enable this feature on your mobile, follow these few simple steps given below.
Step 1: Open Facebook.
Go to the home screen of your phone and tap on the Facebook app to launch it.
Step 2: Go to the Menu
On your screen, you will see a Menu Icon. If you are an Android user, you will see this icon in the top right corner, and if you are an iPhone user, you will see this icon in the bottom right corner.
Tap on it to see further options.
Step 3: Go to Settings
Once you are in the menu, tap on “Settings & Privacy.” Then tap on “Settings.”
Step 4: Select “Media”
Now, from the Preferences list, click on “Media” to customize your Autoplay settings.
Step 5: Set the Desired Autoplay Settings
Here, you will see three different options for your Autoplay settings. Check the box of either “On Mobile Data and Wi-Fi” or “On Wi-Fi Only” in order to enable the autoplay.
Your videos will now play automatically on your News Feed.
If you wish to turn the autoplay feature off, simply check the “Never Autoplay Videos” box.
Conclusion
Facebook’s Autoplay feature is a great feature for viewers as well as content creators. It allows viewers to get a glimpse of what the idea is about, and on the other hand, it acts as a default preview from the content creator’s point of view.
In this article, different methods and techniques have been mentioned which you can use to enable or disable the Autoplay feature for your YouTube or other videos that you upload on to Facebook.
We hope it helps!
- Title: [New] 2024 Approved Unveiling the Techniques for Autoplay YouTube Videos on FB
- Author: Emma
- Created at : 2024-07-18 03:03:45
- Updated at : 2024-07-19 03:03:45
- Link: https://facebook-videos.techidaily.com/new-2024-approved-unveiling-the-techniques-for-autoplay-youtube-videos-on-fb/
- License: This work is licensed under CC BY-NC-SA 4.0.