![[New] In 2024, Engage Viewers Directly Tips for Live Video Screen-Share](https://thmb.techidaily.com/d04c4091c93f7c6e0ae17b31cbbed37cb1d18932b8605027dfc827051ad0a043.jpg)
"[New] In 2024, Engage Viewers Directly Tips for Live Video Screen-Share"
Engage Viewers Directly: Tips for Live Video Screen-Share
Facebook Video Editor - Wondershare Filmora
Provide abundant video effects - A creative video editor
Powerful color correction and grading
Detailed tutorials provided by the official channel
Good news for influencers, content creators, and businesses alike! You can now use Facebook live screen share right from the app itself. Save yourself extra time and work. Use the Facebook platform’s option to share the screen directly.
This comes as a massive relief to creators everywhere. Formerly, creators had to rely on third-party software to share screens on Facebook live. Now you can bypass the complicated screen sharing process to dive into your content. This lets audiences immerse themselves deeply in your content. This blog can guide how to share screen on Facebook live using android, iPhone, and your desktop.
In this article
Part 1: Share Facebook Live Screen on Android
Part 2: Share Facebook Live Screen on iPhone
Part 3: Share Facebook Live Screen on Desktop
Part 1. Share Facebook Live Screen on Android
You can use Facebook live screen share on mobile devices. This means you can do more with live streams. As Facebook is becoming of the biggest live-sharing platforms in the world. It makes sense to have the convenience of streaming anywhere or anytime. Without further ado, let’s get into it. There’s no way around using a third-party app when you’re trying to share your screen on Facebook live.
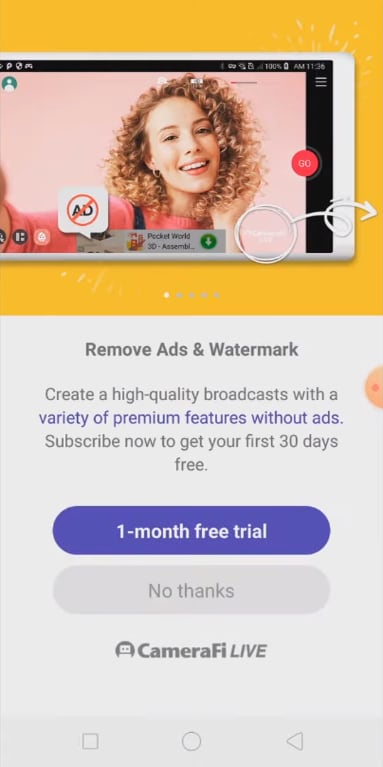
The screen recording feature is not native to android. So, we need other apps to help bridge the gap. One such app is CameraFi Live. Let’s see how we can use it to
Step 1: Download and install both Facebook and CameraFi Live app. This app allows you to stream videos live across multiple social media platforms.

Step 2: Go to the app, and agree with the terms of use. This will give you access to the app. You can use the app for free on a one-month trial basis for premium features. You can skip this by going ‘No Thanks.’

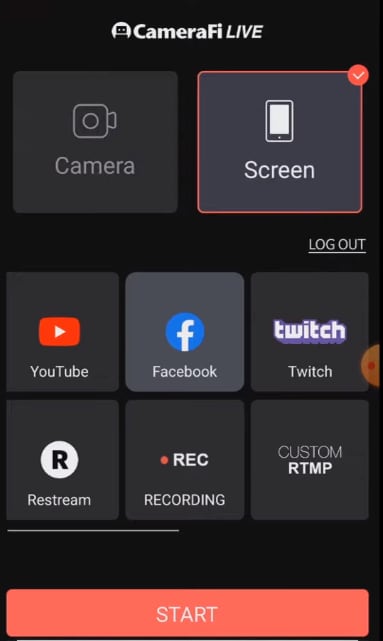
Step 3: On the app’s home screen, select either Camera to stream using your face. Alternatively, select ‘Screen’ to stream what your phone does.
Step 4: After this, you can choose which platform you want to stream on. You have options for multiple popular video-sharing sites like YouTube, Twitch, Facebook, and more.
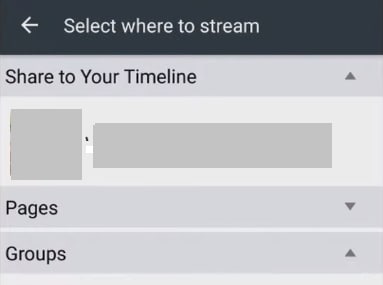
Step 5: If you chose Facebook, you have more options. You can choose to stream to your Timeline, Pages, or Groups. Once chosen, it will take you to the home page. Tap start to go live.
With this, you can easily use Facebook live on android. At the end of the broadcast, you can choose to save, delete or share your live video. Facebook live also comes with the option to raise money for a cause. Facebook provides an option to donate money during your stream. You can donate this to a non-profit or charitable organization.
Part 2. Share Facebook Live Screen on iPhone
Learning how to use Facebook live screen share iPhone is easy. Thanks to the introduction of many new features and upgrades. Any iOS model after iOS 11 can now offer screen recording on iPhone itself. You can also learn how to share your screen on Facebook live. Here’s how to do it.
Step 1: If your iOS is updated to iOS 11, you can make use of these functions. If not, see if you can update the firmware. Update your Facebook app to the latest version. Remember to allow permissions requested by the app itself.
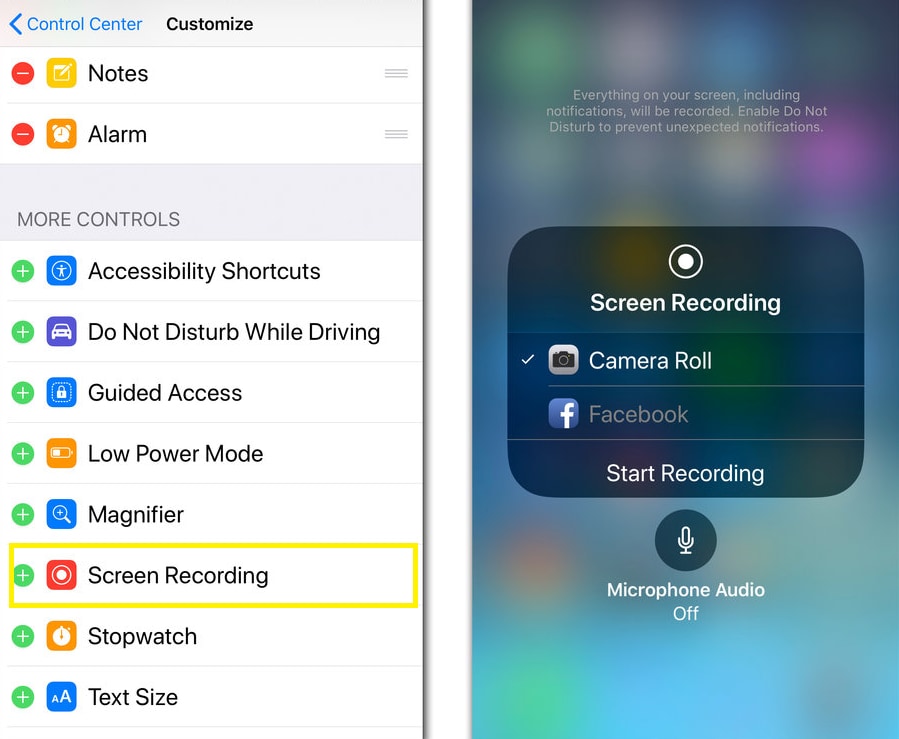
Step 2: Go to ‘Settings’ on your iPhone. Approach’ Control Center’. Find the ‘Screen Recorder’ feature and enable it. You can now access the screen recorder by swiping it down on the iPhone home page.
Step 3: Tap on the icon with a filled, white circle inside a ring. This icon represents screen capture. Tap on the icon to open the app.
Step 4: If you want to live to stream your screen, you need to tap and hold the ‘Start Record’ button. Tap on the Facebook icon from the menu. You can also choose to use the external microphone or not.
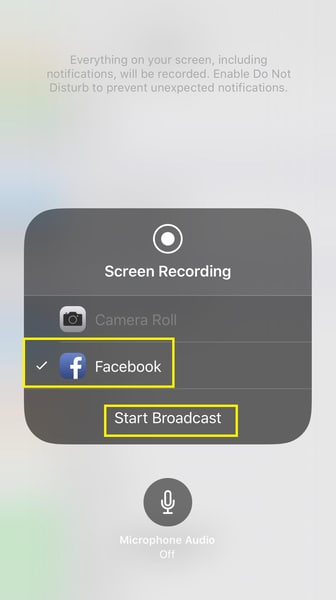
Step 5: Tap on ‘Start Broadcasting’ to broadcast your iPhone screen on Facebook live.
With this, you can easily stream your iPhone’s actions to your Facebook feed as a live stream. Two things to quickly note if you’re planning on streaming from your iPhone. The stream quality will depend on your network connection, the internet speed you have, and the stability of the connection. It’s advised that you stay on WiFi when streaming from your phone. This can minimize interruptions and establish a clear and strong internet connection.
One special feature of live broadcasts is that you can access extra features if you Live broadcast to Pages. This will give you a breakdown of the analytics associated with your live in Creator Studio. You can also make stipulations on the audience and geographical regions. This means you can control who watches your live streams. You can also stipulate who can watch your video broadcasts.
Part 3. Share Facebook Live Screen on Desktop
It can be easier to stream live from your desktop. Just remember to use a wired connection to secure your internet. This can help keep your stream live without any interruptions. You can kick back and watch Facebook live with friends. If you’re the one creating the stream, then let’s go. Let’s look at how we can share Facebook live screen on desktop.
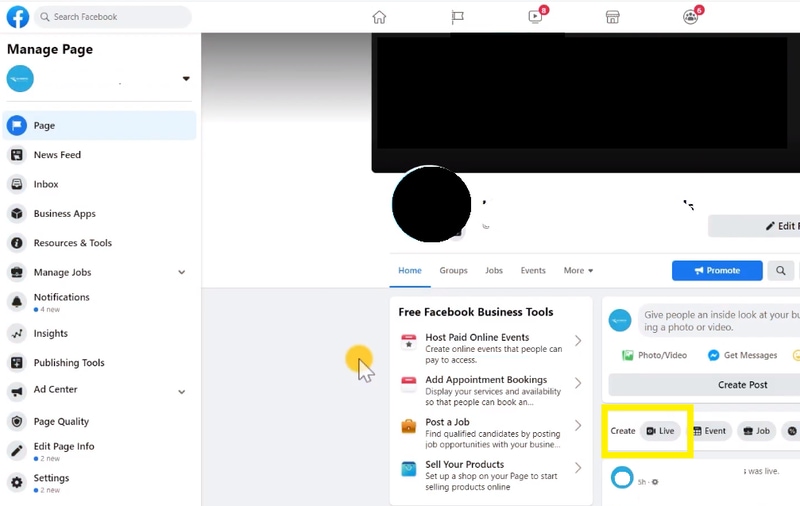
Step 1: Log in to Facebook using your credentials. Once you’re logged in, go to the home page. On the home page, look for the ‘Create Posts’ option. You can see the option to create ‘Live,’ ‘Event,’ ‘Jobs,’ and more underneath this.
Step 2: Choose ‘live video’ from that list of options. This will open a new page with two choices. You can choose to ‘Go Live.’ Alternatively, you can also choose to ‘Create live video events.’ Creating a live event gives your audience a chance to engage with you by responding to the event. Facebook also sends a reminder about the event before the schedule.
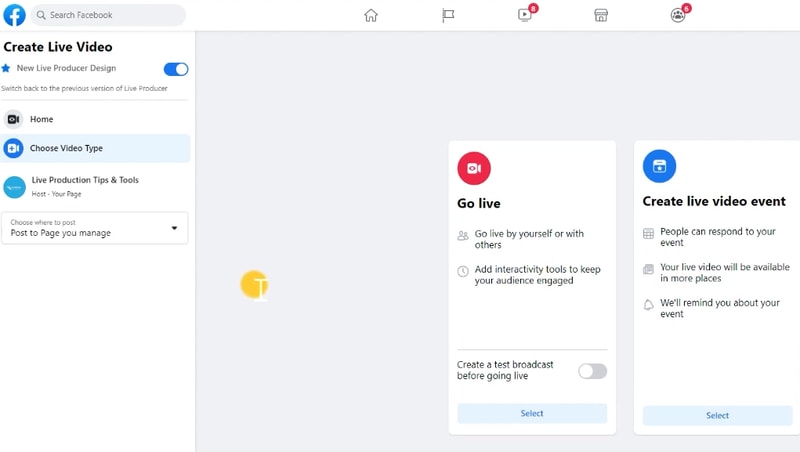
Step 3: You can choose to ‘Go Live.’ This means you can simply go live for a casual update. It comes with the ability to add interactivity tools for your Facebook audience. You can preview how your live stream is going to look. This is done by using the ‘Create a test broadcast before going live’ button. Toggle it on and click on ‘Select.’
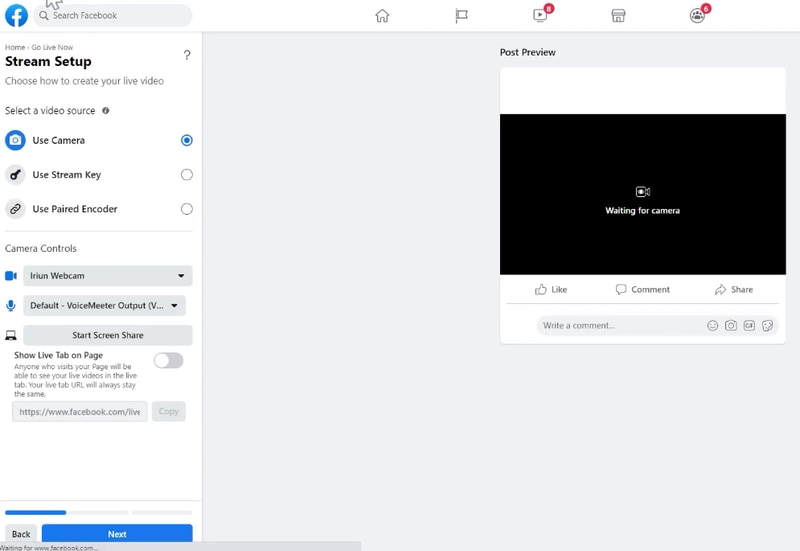
Step 4: Regardless of if you choose to go live or choose a test broadcast, you’ll go to the “Stream Setup” page. This page gives you many options on how to set up your stream. Look at the left-side panel options. You can choose which camera you want as your input source. Select the microphone you want to use on the page. Below the microphone icon is the button for ‘Start Screen Share.’
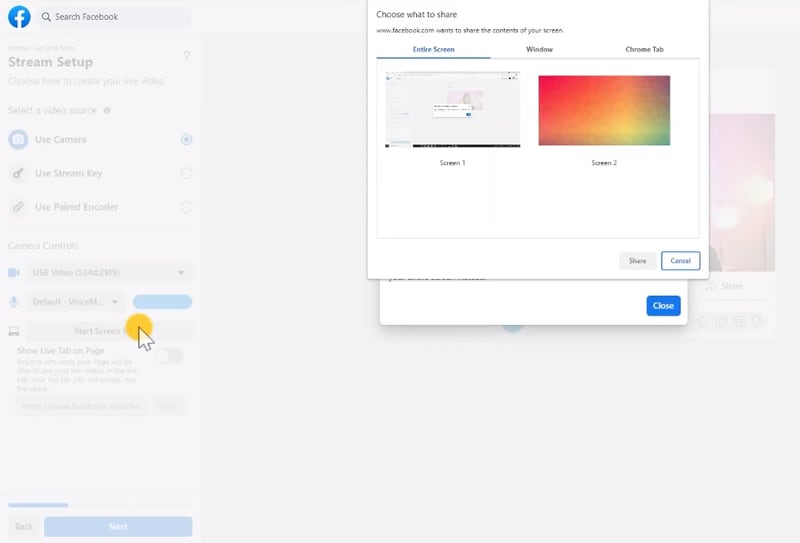
Step 5: Once you click on ‘Start Screen Share,’ a new dialog box pops open. It gives you the option of sharing’ Entire Screen.’, ‘Window,’ or ‘Chrome Tabs.
Step 6: Under the ‘Entire Screen’ option, you can share the current window open as ‘Screen 1’. You can also share your desktop background if you choose. This shows up as ‘Screen 2’. Once you’ve made your choice, tap on the ‘Share’ button. This creates a “Post Preview.” You can see what the post will look like when it goes live. Click on ‘Next’ on the bottom left of the screen to continue.
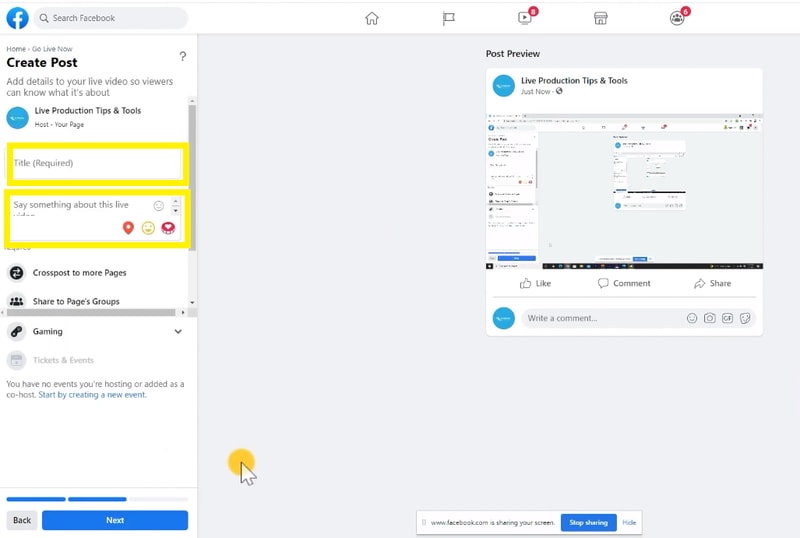
Step 7: Simply fill out the live stream post details on the left side panel. Fill out details like the live stream title in the ‘Title Required’ box. You can add additional descriptions in the prompt box beneath the title box. Click on ‘Next’ when you’re done filling in the details.
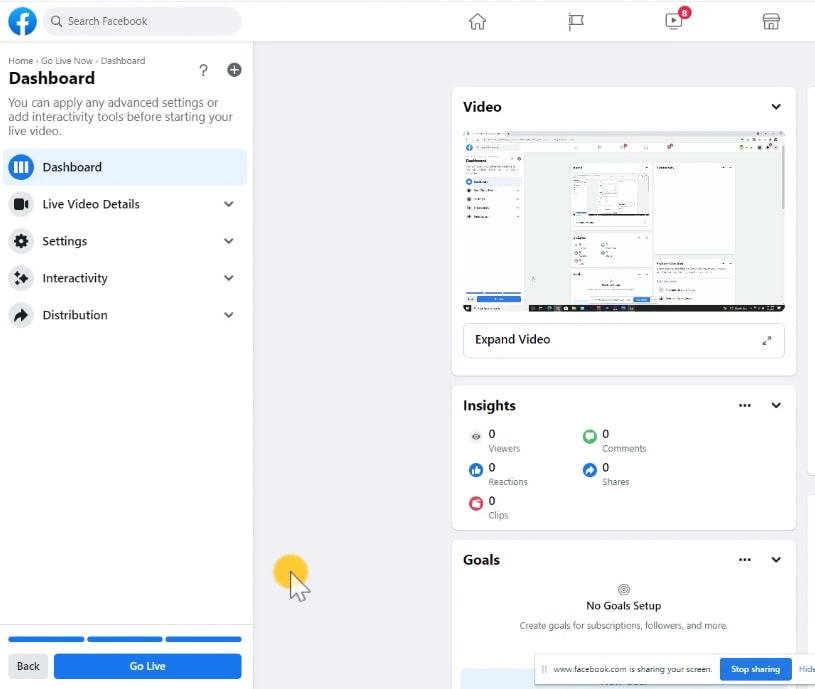
Step 8: You’ll now see the Dashboard. Beneath the Dashboard, you can spot the ‘Go Live’ button. Once you’re happy with the live video setup, you can click on the ‘Go Live’ button. The live video is set up with a countdown from three to one. Your video then goes live.
One drawback to the Facebook live screen share function is that you can’t show your face. It cannot support screen sharing and a window with webcam settings simultaneously. You can get around this function by using a video editor like Wondershare Filmora .
It is a feature-rich video editor. It can help you edit videos for Facebook live screen share. You can lean into the software for your shared screen needs. With options like Green Screen, Split Video editing. You can easily create a polished video for your target audience. Filmora video editor comes with compelling visual effects, transitions, and audio effects. The interface is user-friendly and can be used to full capacity by hobbyists and professionals alike.
Conclusion
So, as you see, you can share your screen on Facebook Live for a more engaging and fruitful interaction with your audience. Hope this guide helps you understand how to do this on different platforms.
Thanks to Facebook’s new update, creating live videos with screen sharing has never been easier. You can now expand your repertoire by using android, iOS, and your desktop. Hope this keeps you fulfilled on your creative journey.
Good news for influencers, content creators, and businesses alike! You can now use Facebook live screen share right from the app itself. Save yourself extra time and work. Use the Facebook platform’s option to share the screen directly.
This comes as a massive relief to creators everywhere. Formerly, creators had to rely on third-party software to share screens on Facebook live. Now you can bypass the complicated screen sharing process to dive into your content. This lets audiences immerse themselves deeply in your content. This blog can guide how to share screen on Facebook live using android, iPhone, and your desktop.
In this article
Part 1: Share Facebook Live Screen on Android
Part 2: Share Facebook Live Screen on iPhone
Part 3: Share Facebook Live Screen on Desktop
Part 1. Share Facebook Live Screen on Android
You can use Facebook live screen share on mobile devices. This means you can do more with live streams. As Facebook is becoming of the biggest live-sharing platforms in the world. It makes sense to have the convenience of streaming anywhere or anytime. Without further ado, let’s get into it. There’s no way around using a third-party app when you’re trying to share your screen on Facebook live.
The screen recording feature is not native to android. So, we need other apps to help bridge the gap. One such app is CameraFi Live. Let’s see how we can use it to
Step 1: Download and install both Facebook and CameraFi Live app. This app allows you to stream videos live across multiple social media platforms.
Step 2: Go to the app, and agree with the terms of use. This will give you access to the app. You can use the app for free on a one-month trial basis for premium features. You can skip this by going ‘No Thanks.’
Step 3: On the app’s home screen, select either Camera to stream using your face. Alternatively, select ‘Screen’ to stream what your phone does.
Step 4: After this, you can choose which platform you want to stream on. You have options for multiple popular video-sharing sites like YouTube, Twitch, Facebook, and more.
Step 5: If you chose Facebook, you have more options. You can choose to stream to your Timeline, Pages, or Groups. Once chosen, it will take you to the home page. Tap start to go live.
With this, you can easily use Facebook live on android. At the end of the broadcast, you can choose to save, delete or share your live video. Facebook live also comes with the option to raise money for a cause. Facebook provides an option to donate money during your stream. You can donate this to a non-profit or charitable organization.
Part 2. Share Facebook Live Screen on iPhone
Learning how to use Facebook live screen share iPhone is easy. Thanks to the introduction of many new features and upgrades. Any iOS model after iOS 11 can now offer screen recording on iPhone itself. You can also learn how to share your screen on Facebook live. Here’s how to do it.
Step 1: If your iOS is updated to iOS 11, you can make use of these functions. If not, see if you can update the firmware. Update your Facebook app to the latest version. Remember to allow permissions requested by the app itself.
Step 2: Go to ‘Settings’ on your iPhone. Approach’ Control Center’. Find the ‘Screen Recorder’ feature and enable it. You can now access the screen recorder by swiping it down on the iPhone home page.
Step 3: Tap on the icon with a filled, white circle inside a ring. This icon represents screen capture. Tap on the icon to open the app.
Step 4: If you want to live to stream your screen, you need to tap and hold the ‘Start Record’ button. Tap on the Facebook icon from the menu. You can also choose to use the external microphone or not.
Step 5: Tap on ‘Start Broadcasting’ to broadcast your iPhone screen on Facebook live.
With this, you can easily stream your iPhone’s actions to your Facebook feed as a live stream. Two things to quickly note if you’re planning on streaming from your iPhone. The stream quality will depend on your network connection, the internet speed you have, and the stability of the connection. It’s advised that you stay on WiFi when streaming from your phone. This can minimize interruptions and establish a clear and strong internet connection.
One special feature of live broadcasts is that you can access extra features if you Live broadcast to Pages. This will give you a breakdown of the analytics associated with your live in Creator Studio. You can also make stipulations on the audience and geographical regions. This means you can control who watches your live streams. You can also stipulate who can watch your video broadcasts.
Part 3. Share Facebook Live Screen on Desktop
It can be easier to stream live from your desktop. Just remember to use a wired connection to secure your internet. This can help keep your stream live without any interruptions. You can kick back and watch Facebook live with friends. If you’re the one creating the stream, then let’s go. Let’s look at how we can share Facebook live screen on desktop.
Step 1: Log in to Facebook using your credentials. Once you’re logged in, go to the home page. On the home page, look for the ‘Create Posts’ option. You can see the option to create ‘Live,’ ‘Event,’ ‘Jobs,’ and more underneath this.
Step 2: Choose ‘live video’ from that list of options. This will open a new page with two choices. You can choose to ‘Go Live.’ Alternatively, you can also choose to ‘Create live video events.’ Creating a live event gives your audience a chance to engage with you by responding to the event. Facebook also sends a reminder about the event before the schedule.
Step 3: You can choose to ‘Go Live.’ This means you can simply go live for a casual update. It comes with the ability to add interactivity tools for your Facebook audience. You can preview how your live stream is going to look. This is done by using the ‘Create a test broadcast before going live’ button. Toggle it on and click on ‘Select.’
Step 4: Regardless of if you choose to go live or choose a test broadcast, you’ll go to the “Stream Setup” page. This page gives you many options on how to set up your stream. Look at the left-side panel options. You can choose which camera you want as your input source. Select the microphone you want to use on the page. Below the microphone icon is the button for ‘Start Screen Share.’
Step 5: Once you click on ‘Start Screen Share,’ a new dialog box pops open. It gives you the option of sharing’ Entire Screen.’, ‘Window,’ or ‘Chrome Tabs.
Step 6: Under the ‘Entire Screen’ option, you can share the current window open as ‘Screen 1’. You can also share your desktop background if you choose. This shows up as ‘Screen 2’. Once you’ve made your choice, tap on the ‘Share’ button. This creates a “Post Preview.” You can see what the post will look like when it goes live. Click on ‘Next’ on the bottom left of the screen to continue.
Step 7: Simply fill out the live stream post details on the left side panel. Fill out details like the live stream title in the ‘Title Required’ box. You can add additional descriptions in the prompt box beneath the title box. Click on ‘Next’ when you’re done filling in the details.
Step 8: You’ll now see the Dashboard. Beneath the Dashboard, you can spot the ‘Go Live’ button. Once you’re happy with the live video setup, you can click on the ‘Go Live’ button. The live video is set up with a countdown from three to one. Your video then goes live.
One drawback to the Facebook live screen share function is that you can’t show your face. It cannot support screen sharing and a window with webcam settings simultaneously. You can get around this function by using a video editor like Wondershare Filmora .
It is a feature-rich video editor. It can help you edit videos for Facebook live screen share. You can lean into the software for your shared screen needs. With options like Green Screen, Split Video editing. You can easily create a polished video for your target audience. Filmora video editor comes with compelling visual effects, transitions, and audio effects. The interface is user-friendly and can be used to full capacity by hobbyists and professionals alike.
Conclusion
So, as you see, you can share your screen on Facebook Live for a more engaging and fruitful interaction with your audience. Hope this guide helps you understand how to do this on different platforms.
Thanks to Facebook’s new update, creating live videos with screen sharing has never been easier. You can now expand your repertoire by using android, iOS, and your desktop. Hope this keeps you fulfilled on your creative journey.
Also read:
- [New] 2024 Approved Elevate Your Facebook Chronicles with Gratuitous Upgrades
- [New] In 2024, Mastering Desktop & Mobile Incorporate Timestamps on YouTube
- [New] Text Gymnastics Ingenious Techniques for Animated Bounces
- [Updated] 2023 | Facebook Short Videos and Everything About Them
- [Updated] In 2024, Cybernetic Salvation Reuniting with Your FB World
- [Updated] Mastering Video Placement on Social Media Platforms for 2024
- [Updated] Peering Into the Heart of 4K Vision with BenQ’s Ultra HD Model, BL2711U
- 2024 Approved Zany Zooms IPhone Meme World
- Cutting-Edge Mac HD Screen and Sound Mastery
- Efficiently Remove Your Windows 8 Backups with These Simple Auto-Deletion Tips
- Gathering Online Chat Melodies for 2024
- Updated In 2024, Best 6 Video Dubbing Software for PC
- Voice-Activated Data Collection on iOS Ranking the Top 10 Apps for 2024
- Win7 Printer Online After Repair
- Title: [New] In 2024, Engage Viewers Directly Tips for Live Video Screen-Share
- Author: Emma
- Created at : 2024-12-01 23:16:06
- Updated at : 2024-12-07 19:57:57
- Link: https://facebook-videos.techidaily.com/new-in-2024-engage-viewers-directly-tips-for-live-video-screen-share/
- License: This work is licensed under CC BY-NC-SA 4.0.