![[Updated] 2024 Approved Creating Captivating Slideshows on the Social Media Giant](https://thmb.techidaily.com/48994c9ff35faf512b4c69833faf0e7ff28b80b0df78e2f2b0d58f413fb2991f.jpg)
"[Updated] 2024 Approved Creating Captivating Slideshows on the Social Media Giant"
Creating Captivating Slideshows on the Social Media Giant
Facebook Slideshow Maker: How to Make a Facebook Slideshow

Shanoon Cox
Mar 27, 2024• Proven solutions
With Facebook slideshow becoming more and more popular on social media websites, undoubtly you’ll never want to miss an eye-catching slideshow presentation on the largest social network platform Facebook. You may have uploaded many favorite photos to Facebook, but all of the photos on Facebook need to be viewed individually. Don’t you think it is a big tiresome job for your friends and family when click Previous/Next button to view the photos one by one? Now Facebook slideshow can help you.
So this article is mainly about how to create a Facebook slideshow. With a Facebook slideshow maker like Wondershare Filmora , you will learn how to step forward to make slideshows for Facebook.
- Part 1: Recommended Facebook Slideshow Maker Filmora
- Part 2: How to Use Facebook Slideshow Maker on Facebook Page Online
- Part 3: Facebook slideshow maker: another way to make slideshow
- Part 4: 5 Tips for Making Facebook Slideshow
Part 1: Recommended Facebook Slideshow Maker: Filmora Business
The latest version 9 of Filmora video editor provides a lot of royalty free music in the Audio library, you can choose from different styles including Electronic, Folk, Rock, Tender & Sentimental, Young & Bright. Besides, you can also add the specially designed Sound Effects to the Facebook Slideshow.
Filmora allows you to create different aspect ratio videos such as the normally 16:9, 9:16, 1:1, and 4:3, but you can also custom the aspect ratio to the desired settings based on the slideshow usages. You can make square video in Filmora.
The best part of using Filmora to creating Facebook slideshow is that you can add as many as photos and images (while with the Facebook Slideshow maker, you can only add 3 to 10 photos).
You also can add transitions to your Facebook slideshow. Filmora Business includes more than 100 transitions including fade in/out, bar, cubes and more. Now download it to have a try (free)!
 Download Mac Version ](https://tools.techidaily.com/wondershare/filmora/download/ )
Below is a simple guide about how to make a Facebook Slideshow with music in Filmora video editor.
Step 1: Import photos to slidershow maker
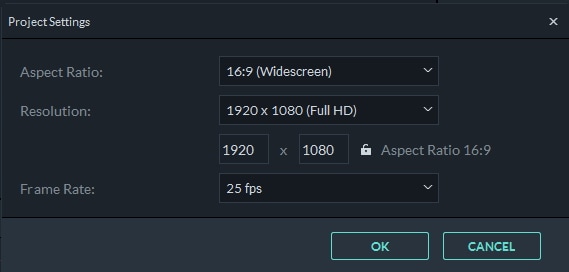
Download and launch Filmora, click New Project to create a new slideshow project. Go to the Project Settings under File menu to set up the aspect ratio and resolution at first. Import all the photos for Facebook slideshow to the media library and then drag them to the video track and place in order.
Step 2: Edit slideshow with music/transition/text
Now, you can add the built in music and sound effect from Audio tab, or you can add your own music file to the media library and then drag-n-drop it to the audio track in the timeline. To play the slideshow smoother, we recommend you to add some transitions between the photos. With Filmora, you can add specific transition to selected clips or add transitions to selected clips randomly and even to all clips. Since Facebook video is played muted by default, it is recommended to add title & text to the photo slideshow as well.

Step 3: Export video
Of course, you can also add overlays, filters, and elements to the photo slideshow based on your needs. After all these editing, click the Export to save the video in popular Facebook slideshow formats such as mp4, mov etc or you can also upload video to YouTube directly if needed.
For the detailed information about how to edit videos in Filmora, you can check ourultimate guide for editing videos .
Download Mac Version ](https://tools.techidaily.com/wondershare/filmora/download/ )
Part 2: How to Use Facebook Slideshow Maker on Facebook Page Online
In fact, you can also make Facebook slideshow on Facebook homepage. It is designed for people who want to make excellent slideshow on mobile and desktop. The steps are not difficult, but the features are limited as it is an online tool. Now, let’s check out how to make slideshow on Facebook.
What you should know before making slideshow on Facebook
1. Image quality: It is recommended to use high quality photos to make slideshow. The minimum image size is 1280 x 720 pixels. You also need to use the same aspect ratio of all images. Otherwise, the slideshow will be the default number 1:1.
2. Music license: Copyright needs us to pay attention on Facebook. If you are going to use music in your slideshow, you must use royalty free music in case of having legal issue. Or, you can also buy some audio within your budget.
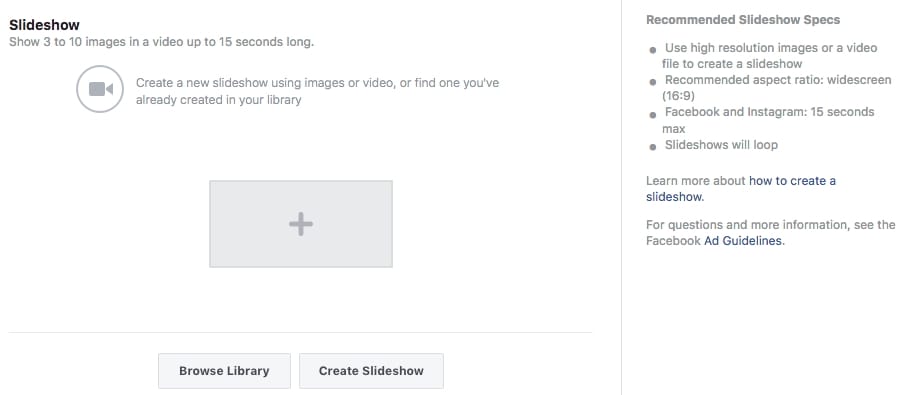
Step 1: Click Share a photo or video
Open up Facebook to log in. Go to the homepage and click Share a photo or video. From there, you can choose Create a Slideshow. Now click Add Photos to import photos. The selected images will appear below the window.
Note: The maximum images you can import are 10.

Step 2: Edit aspect ratio
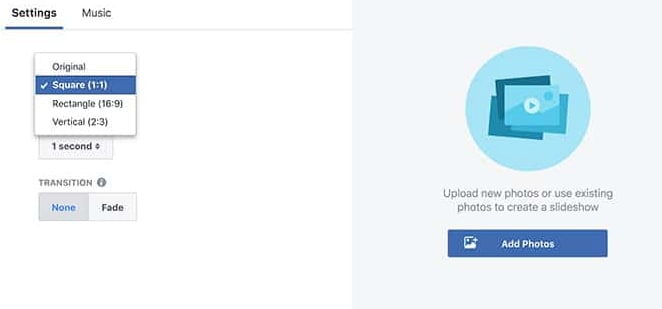
You must choose the right aspect ratio for Facebook slideshow. You can select aspect ratio from 1:1, 16:9, 2:3. If you want to use square video, just choose 1:1. If you like landscape slideshow video, choose 16:9. You can also use the first image aspect ratio to decide the rest aspect ratio.
Step 3: Change image duration
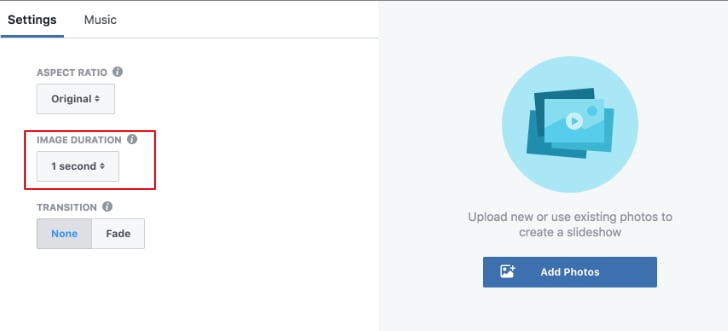
The whole duration can’t be larger than 15 seconds, so it is not suggested to import many images. For each image, you can choose 0.5, 1, 2, 3, 4 and 5 seconds.
Step 4: Add transition to Facebook slideshow
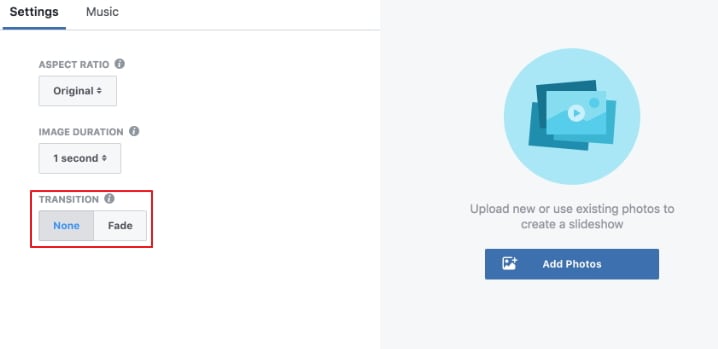
You can also choose None or Fade to add transition. If you want to have a better transition effect, it is suggested to add transition.
Step 5: Add music to slideshow
Music plays an important in making slidedhow, so it is highly suggested to add music to Facebook slideshow. Now, music has went to a different tab. You can add music in this tab. Before, you can only add music to slidehow from the music Facebook offered for you. The new change is you can add your own music track to your slideshow. If you have some royalty free music, this feature is a life saver. You can choose the music style you like to use. On Facebook slideshow maker, you can edit images. It supports music format WAV, MP3, M4A, FLAC and OGG. After all settings are done, you can start uploading photos. Click plus icon and then choose whether you want to choose images from your computer or take a photo right away. Now you can see all of them are on your timeline.

Step 6: Test Facebook slideshow
Now click Create Slideshow. You can enter message to explain this slideshow. Each slideshow can play from 0.5 to 5 seconds. You can edit the photos before you publishing. It is adviced to check your slideshow before publishing it. You can’t edit it after it is published.
Step 7: Preview and publish it
Now click play icon to preivew it. It is highly recommended to add title and description to your slishow if you want people notice your slideshow quickly. You can also download tne new-created slideshow. Click boost post and set budget to complete it. In the end, click publish. Here are tips to make slideshow on Facebook .
Part 3: Facebook slideshow maker: another way to make slideshow
Step 1: Add photos for Facebook Slideshow
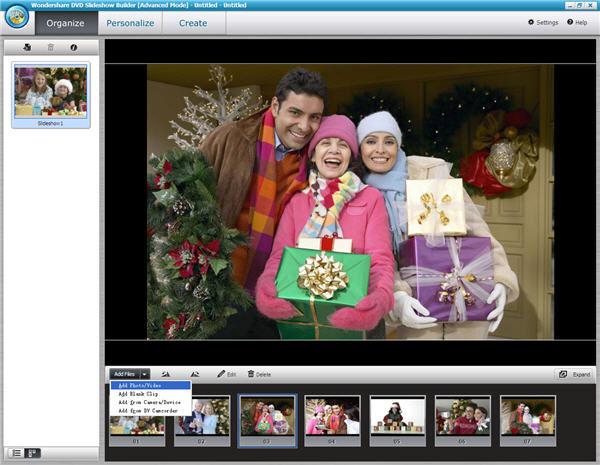
Here takes DVD Slideshow Builder for Windows for example. Firstly open the software and select all of your desired photos which will be appeared on your Facebook Slideshow. Simply click on “Add Files” button to import photos.
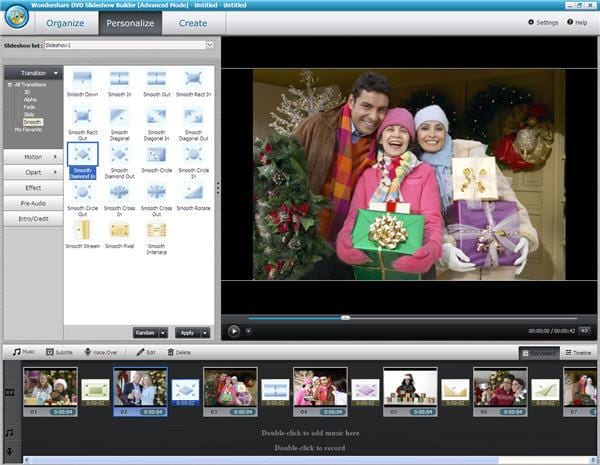
Step 2: Personalize your Facebook Slideshow
In advanced mode, the transition effects will be randomized automatically when you import photos. You can change photo transitions as you like, just drag and drop your desired transition effect in the middle of two photos.
If you want, you can add background music to Facebook slideshow by double-clicking the empty area in Background Music panel.
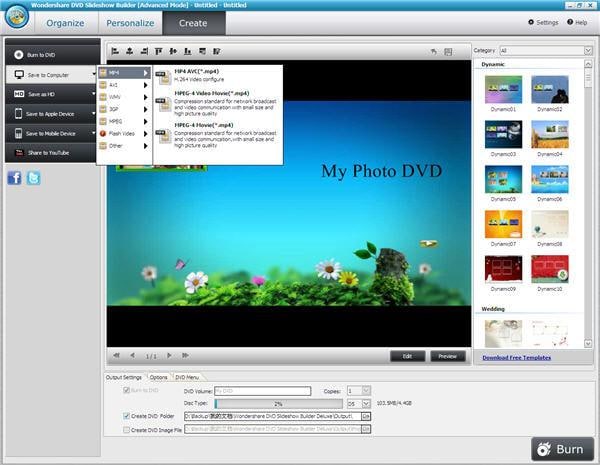
Step 3: Save Slideshow in MP4 Format
Go to Create Tab and in the Output formats drop-down list, select MP4 as the video format. Then click Start to save slideshow for Facebook. You can also go to Options button to customize video slideshow options, e.g., the video resolution, frame rate, bitrate, audio sample rate, etc.
Step 4: Upload Video Slideshow to Facebook
After logining to your Facebook account, you may notice that there is a Video Tab on your Facebook profile. Here you can upload created slideshows. Click Upload to open uploading page. Then click Browse button to choose desired video slideshow to upload. After upload the video to Facebook, you can also fill some necessary information about your Facebook video slideshow.

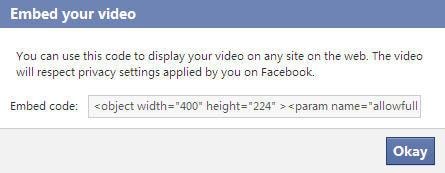
Step 5: Embed Facebook Slideshow to Other Websites
To share Facebook video with more people, get to the Facebook video you want to share. Then click Embed This Video button and get the Facebook video code. Paste it to any web page that supports video embedding. See, share Facebook slideshow is that easy.
Part 4: 5 Tips for Making Facebook Slideshow
After you know how to make slideshow in 3 different ways, here we will let you know 5 tips for making a photo slideshow on Facebook. You can make slideshow now, but if you want to make high quality video slideshow, these tips are necessary and easy to follow and understand.
1. Make sure to use 3-10 images
If your have only 2 images, the slideshow are too short to let people know your brand or product. Let’s say you have 10 images and one second per image. Then you can get a 10-second slideshow. 10 seconds are enough to grab people’s attention . However, you need to make sure the first 3 seconds are high quality images that people want to continue watching. It is best to add music to make it engaging.
2. Choose the right Facebook slideshow format
It is suggested to use mov and mp4 video format. These 2 formats are compatible well on different devices and the file size won’t too large. If you upload Facebook slideshow on other formats, the final file might be too heavy. As a result, the video slideshow will be slower when it is playing.
3. Edit your Facebook slideshow
The slideshow will be boring if you only add images to combine it. It is suggested to add text/title to make your key message appear . Most importantly, you can add transitions to make slideshow look natural. If you are good at editing, you also can correct color or make color grading.
4. Don’t add too many CTAs
We know that you want to do more conversions and get more sales, but if you add CTA on each imgaes, it is a mistake. People will close your slideshow video. You need to add CTAs wisely .
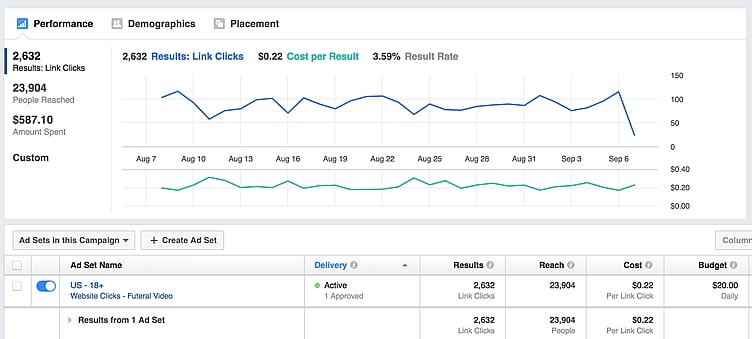
5. Rememeber to make test
You won’t know which version is better if you don’t make A/B test. You can run 2 ads in one campaign to see which ad is better. You need to make sure the budget, bid and landing page are the same of the 2 ads. After the test is over, analyze it and choose the best one for you.
Conclusion
Above are three methods of making Facebook slideshow. Don’t know which Facebook slideshow maker to choose? It is advised to use Filmora Business if you want to have more controls of your slideshow. You can use it to add free to use music and titles to make your slideshow stand out! Download it now to have a try!
Download Mac Version ](https://tools.techidaily.com/wondershare/filmora/download/ )
Shanoon Cox
Shanoon Cox is a writer and a lover of all things video.
Follow @Shanoon Cox
Shanoon Cox
Mar 27, 2024• Proven solutions
With Facebook slideshow becoming more and more popular on social media websites, undoubtly you’ll never want to miss an eye-catching slideshow presentation on the largest social network platform Facebook. You may have uploaded many favorite photos to Facebook, but all of the photos on Facebook need to be viewed individually. Don’t you think it is a big tiresome job for your friends and family when click Previous/Next button to view the photos one by one? Now Facebook slideshow can help you.
So this article is mainly about how to create a Facebook slideshow. With a Facebook slideshow maker like Wondershare Filmora , you will learn how to step forward to make slideshows for Facebook.
- Part 1: Recommended Facebook Slideshow Maker Filmora
- Part 2: How to Use Facebook Slideshow Maker on Facebook Page Online
- Part 3: Facebook slideshow maker: another way to make slideshow
- Part 4: 5 Tips for Making Facebook Slideshow
Part 1: Recommended Facebook Slideshow Maker: Filmora Business
The latest version 9 of Filmora video editor provides a lot of royalty free music in the Audio library, you can choose from different styles including Electronic, Folk, Rock, Tender & Sentimental, Young & Bright. Besides, you can also add the specially designed Sound Effects to the Facebook Slideshow.
Filmora allows you to create different aspect ratio videos such as the normally 16:9, 9:16, 1:1, and 4:3, but you can also custom the aspect ratio to the desired settings based on the slideshow usages. You can make square video in Filmora.
The best part of using Filmora to creating Facebook slideshow is that you can add as many as photos and images (while with the Facebook Slideshow maker, you can only add 3 to 10 photos).
You also can add transitions to your Facebook slideshow. Filmora Business includes more than 100 transitions including fade in/out, bar, cubes and more. Now download it to have a try (free)!
Download Mac Version ](https://tools.techidaily.com/wondershare/filmora/download/ )
Below is a simple guide about how to make a Facebook Slideshow with music in Filmora video editor.
Step 1: Import photos to slidershow maker
Download and launch Filmora, click New Project to create a new slideshow project. Go to the Project Settings under File menu to set up the aspect ratio and resolution at first. Import all the photos for Facebook slideshow to the media library and then drag them to the video track and place in order.
Step 2: Edit slideshow with music/transition/text
Now, you can add the built in music and sound effect from Audio tab, or you can add your own music file to the media library and then drag-n-drop it to the audio track in the timeline. To play the slideshow smoother, we recommend you to add some transitions between the photos. With Filmora, you can add specific transition to selected clips or add transitions to selected clips randomly and even to all clips. Since Facebook video is played muted by default, it is recommended to add title & text to the photo slideshow as well.
Step 3: Export video
Of course, you can also add overlays, filters, and elements to the photo slideshow based on your needs. After all these editing, click the Export to save the video in popular Facebook slideshow formats such as mp4, mov etc or you can also upload video to YouTube directly if needed.
For the detailed information about how to edit videos in Filmora, you can check ourultimate guide for editing videos .
Download Mac Version ](https://tools.techidaily.com/wondershare/filmora/download/ )
Part 2: How to Use Facebook Slideshow Maker on Facebook Page Online
In fact, you can also make Facebook slideshow on Facebook homepage. It is designed for people who want to make excellent slideshow on mobile and desktop. The steps are not difficult, but the features are limited as it is an online tool. Now, let’s check out how to make slideshow on Facebook.
What you should know before making slideshow on Facebook
1. Image quality: It is recommended to use high quality photos to make slideshow. The minimum image size is 1280 x 720 pixels. You also need to use the same aspect ratio of all images. Otherwise, the slideshow will be the default number 1:1.
2. Music license: Copyright needs us to pay attention on Facebook. If you are going to use music in your slideshow, you must use royalty free music in case of having legal issue. Or, you can also buy some audio within your budget.
Step 1: Click Share a photo or video
Open up Facebook to log in. Go to the homepage and click Share a photo or video. From there, you can choose Create a Slideshow. Now click Add Photos to import photos. The selected images will appear below the window.
Note: The maximum images you can import are 10.
Step 2: Edit aspect ratio
You must choose the right aspect ratio for Facebook slideshow. You can select aspect ratio from 1:1, 16:9, 2:3. If you want to use square video, just choose 1:1. If you like landscape slideshow video, choose 16:9. You can also use the first image aspect ratio to decide the rest aspect ratio.
Step 3: Change image duration
The whole duration can’t be larger than 15 seconds, so it is not suggested to import many images. For each image, you can choose 0.5, 1, 2, 3, 4 and 5 seconds.
Step 4: Add transition to Facebook slideshow
You can also choose None or Fade to add transition. If you want to have a better transition effect, it is suggested to add transition.
Step 5: Add music to slideshow
Music plays an important in making slidedhow, so it is highly suggested to add music to Facebook slideshow. Now, music has went to a different tab. You can add music in this tab. Before, you can only add music to slidehow from the music Facebook offered for you. The new change is you can add your own music track to your slideshow. If you have some royalty free music, this feature is a life saver. You can choose the music style you like to use. On Facebook slideshow maker, you can edit images. It supports music format WAV, MP3, M4A, FLAC and OGG. After all settings are done, you can start uploading photos. Click plus icon and then choose whether you want to choose images from your computer or take a photo right away. Now you can see all of them are on your timeline.
Step 6: Test Facebook slideshow
Now click Create Slideshow. You can enter message to explain this slideshow. Each slideshow can play from 0.5 to 5 seconds. You can edit the photos before you publishing. It is adviced to check your slideshow before publishing it. You can’t edit it after it is published.
Step 7: Preview and publish it
Now click play icon to preivew it. It is highly recommended to add title and description to your slishow if you want people notice your slideshow quickly. You can also download tne new-created slideshow. Click boost post and set budget to complete it. In the end, click publish. Here are tips to make slideshow on Facebook .
Part 3: Facebook slideshow maker: another way to make slideshow
Step 1: Add photos for Facebook Slideshow
Here takes DVD Slideshow Builder for Windows for example. Firstly open the software and select all of your desired photos which will be appeared on your Facebook Slideshow. Simply click on “Add Files” button to import photos.
Step 2: Personalize your Facebook Slideshow
In advanced mode, the transition effects will be randomized automatically when you import photos. You can change photo transitions as you like, just drag and drop your desired transition effect in the middle of two photos.
If you want, you can add background music to Facebook slideshow by double-clicking the empty area in Background Music panel.
Step 3: Save Slideshow in MP4 Format
Go to Create Tab and in the Output formats drop-down list, select MP4 as the video format. Then click Start to save slideshow for Facebook. You can also go to Options button to customize video slideshow options, e.g., the video resolution, frame rate, bitrate, audio sample rate, etc.
Step 4: Upload Video Slideshow to Facebook
After logining to your Facebook account, you may notice that there is a Video Tab on your Facebook profile. Here you can upload created slideshows. Click Upload to open uploading page. Then click Browse button to choose desired video slideshow to upload. After upload the video to Facebook, you can also fill some necessary information about your Facebook video slideshow.
Step 5: Embed Facebook Slideshow to Other Websites
To share Facebook video with more people, get to the Facebook video you want to share. Then click Embed This Video button and get the Facebook video code. Paste it to any web page that supports video embedding. See, share Facebook slideshow is that easy.
Part 4: 5 Tips for Making Facebook Slideshow
After you know how to make slideshow in 3 different ways, here we will let you know 5 tips for making a photo slideshow on Facebook. You can make slideshow now, but if you want to make high quality video slideshow, these tips are necessary and easy to follow and understand.
1. Make sure to use 3-10 images
If your have only 2 images, the slideshow are too short to let people know your brand or product. Let’s say you have 10 images and one second per image. Then you can get a 10-second slideshow. 10 seconds are enough to grab people’s attention . However, you need to make sure the first 3 seconds are high quality images that people want to continue watching. It is best to add music to make it engaging.
2. Choose the right Facebook slideshow format
It is suggested to use mov and mp4 video format. These 2 formats are compatible well on different devices and the file size won’t too large. If you upload Facebook slideshow on other formats, the final file might be too heavy. As a result, the video slideshow will be slower when it is playing.
3. Edit your Facebook slideshow
The slideshow will be boring if you only add images to combine it. It is suggested to add text/title to make your key message appear . Most importantly, you can add transitions to make slideshow look natural. If you are good at editing, you also can correct color or make color grading.
4. Don’t add too many CTAs
We know that you want to do more conversions and get more sales, but if you add CTA on each imgaes, it is a mistake. People will close your slideshow video. You need to add CTAs wisely .
5. Rememeber to make test
You won’t know which version is better if you don’t make A/B test. You can run 2 ads in one campaign to see which ad is better. You need to make sure the budget, bid and landing page are the same of the 2 ads. After the test is over, analyze it and choose the best one for you.
Conclusion
Above are three methods of making Facebook slideshow. Don’t know which Facebook slideshow maker to choose? It is advised to use Filmora Business if you want to have more controls of your slideshow. You can use it to add free to use music and titles to make your slideshow stand out! Download it now to have a try!
Download Mac Version ](https://tools.techidaily.com/wondershare/filmora/download/ )
Shanoon Cox
Shanoon Cox is a writer and a lover of all things video.
Follow @Shanoon Cox
Also read:
- [New] In 2024, Supercharge Your Status Top 8 Apps for Boosting Facebook Popularity
- [New] Social Media Savvy Turning Friends Into Customers and Coins
- [Updated] 2024 Approved Social Media Influencers' Secret Creating Captivating Facebook Biographies
- 2024 Approved Ideal Hosts Maximizing YouTube Video Exposure
- Driving Engagement and Visibility Effective Strategies for FB Video Marketing
- Fix Infinix Note 30 Android System Webview Crash 2024 Issue | Dr.fone
- In 2024, Tricks to Stream Pre-Filmed Footage During Facebook Livestreams
- In 2024, What Legendaries Are In Pokemon Platinum On Honor Magic Vs 2? | Dr.fone
- IPhone用マルチメディア再生: MKVフォーマットへの対応方法を学ぶ【第2章】
- Journey Through Your Watch History Find Latest Views on FB
- Navigate with Speed: Using the Taskbar's Search in Windows 11
- No More Crashes! Expert Tips to Stabilize The Witcher 3 on Your PC
- Reasons why Pokémon GPS does not Work On Oppo A78 5G? | Dr.fone
- Title: [Updated] 2024 Approved Creating Captivating Slideshows on the Social Media Giant
- Author: Emma
- Created at : 2024-12-20 22:28:03
- Updated at : 2024-12-22 18:47:17
- Link: https://facebook-videos.techidaily.com/updated-2024-approved-creating-captivating-slideshows-on-the-social-media-giant/
- License: This work is licensed under CC BY-NC-SA 4.0.