![[Updated] 2024 Approved How to Capture and Share Your Favorite Pics on Social Platforms with OBS](https://www.lifewire.com/thmb/aF2Or3vEIE4OraMHaiFlw5dsdwo=/540x405/filters:no_upscale():max_bytes(150000):strip_icc()/Google-Cloud-Next-59a9cb4a03e644389e2ffa9939c420f8.jpg)
"[Updated] 2024 Approved How to Capture and Share Your Favorite Pics on Social Platforms with OBS"
How to Capture and Share Your Favorite Pics on Social Platforms with OBS
How to live stream facebook from PC, Mac or Laptop with OBS

Richard Bennett
Mar 27, 2024• Proven solutions
Here is the step by step guide to go live from PC to facebook with OBS
If you are using wirecast check this article >>
- Part1.Setting the OBS Scenes
- Part2.Stream setting according to Facebook
- Part3.Preview and Test your before go live
- Part4.Video tutorial
A. Setting the OBS Scenes
Step 1: Make your scenes perfectly ready before starting the actual streaming process.
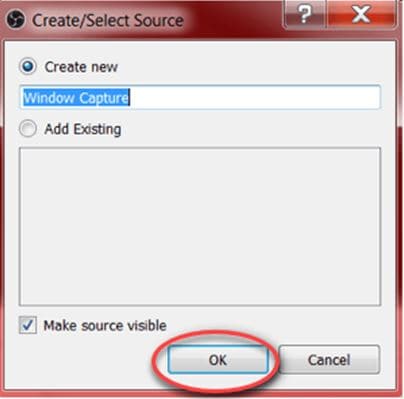
Step 2: Now you need to add sources to the scenes.
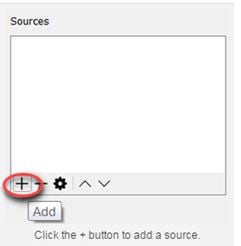
Step 3: It is possible to include windows capture, audio input and webcam as per need.

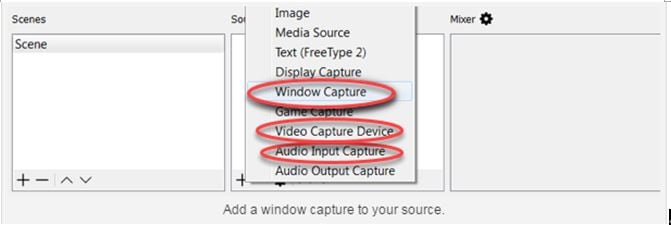
Step 4: Prefer to use default settings for source and then press OK.
Step 5: Once you have done settings for all sources then they must be adjusted on screen in right order.
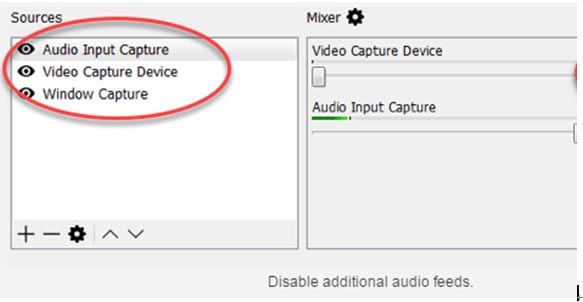
Step 6: You also need to arrange the capture size for your videos. Adjust the right video size.
B. Stream setting according to Facebook
Once you are done with Part A then it is time to follow the guidelines as below:
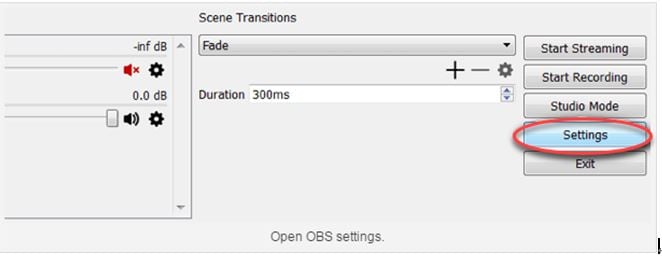
Step 1: First of all you need to go to the settings.
Step 2: Now adjust the bit rate, it must be kept below 4000 Kbps and then choose your preferred recording format.
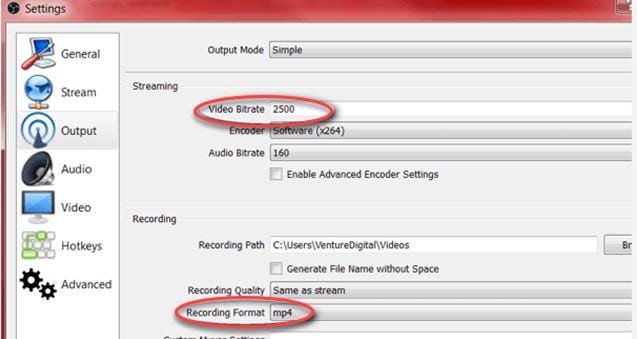
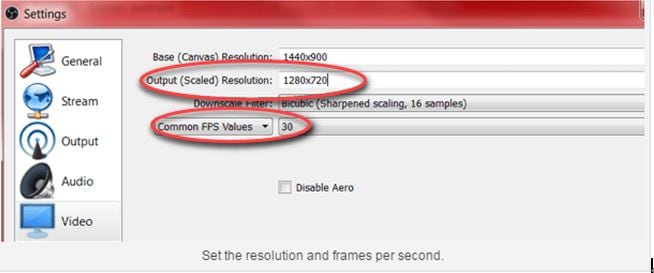
Step 3: Make settings for resolution as well as FPS. The desired maximum resolution level is 720p or 1280x720 whereas frame rate must be kept at 30 fps.

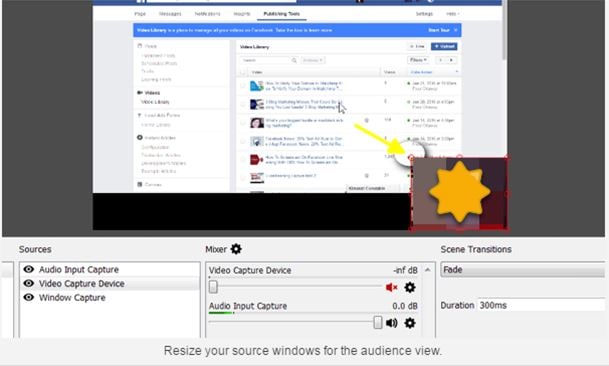
Step 4: Now you need to visit the facebook page and then click on the video, go to publishing tools and then from top right corner hit +Live option.

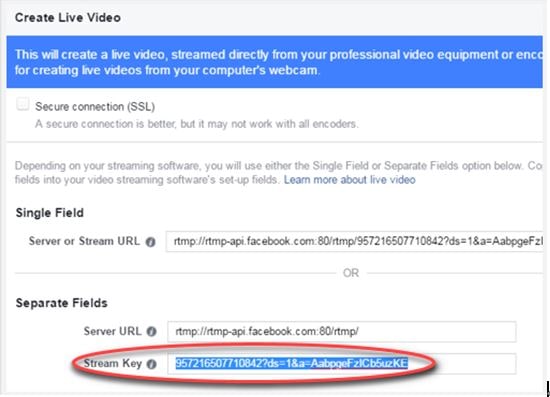
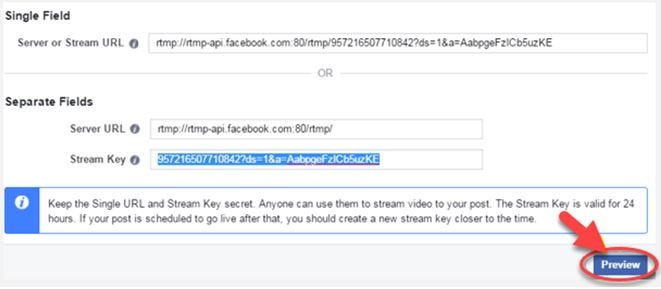
Step 5: It is time to move to the ‘create live video’ page. You have to copy the stream key from the specified location. Prefer to keep this page open.
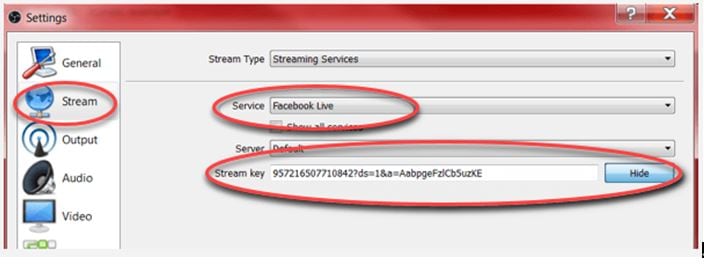
Step 6: Now come back to your OBS settings page and choose stream option. From list of services, prefer to choose Facebook Live option and then simply paste the stream key in the specified field on your screen.
C. Preview and Test your before go live
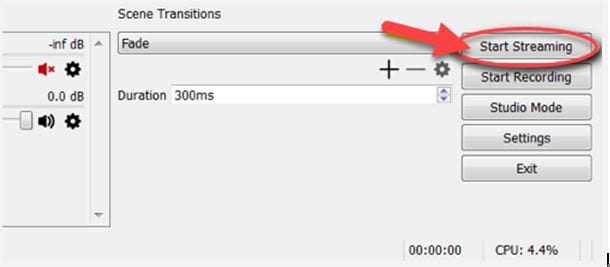
Step 1: It is time to hit the button “Start Streaming”.
Step 2: Now move back to your facebook page and then choose to preview.
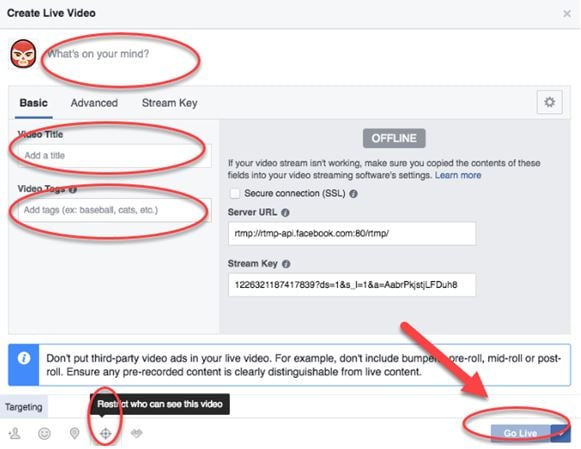
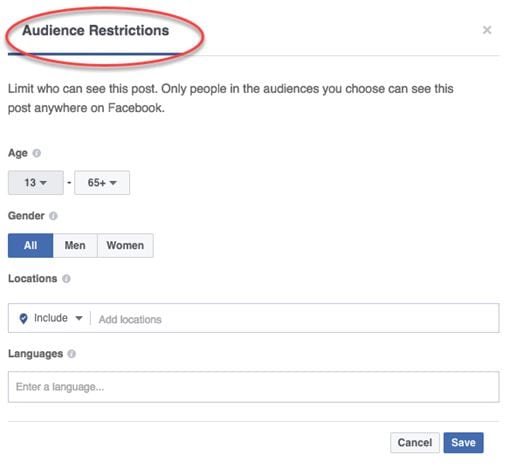
Step 3: It is time to add your title as per preferences, make selection for your targeted audience and once you have finished all settings and testing process then hit button “Go Live”.
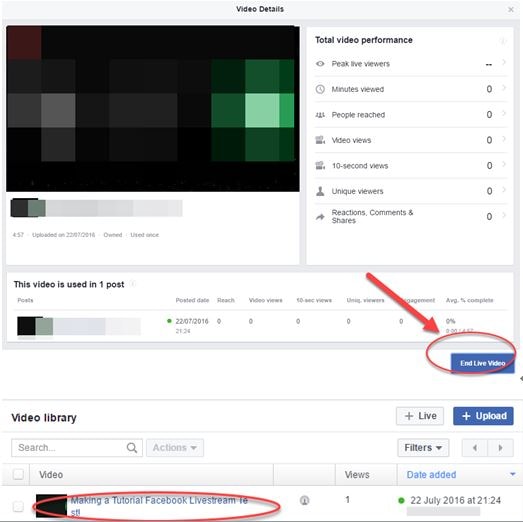
Step 4: Once your procedure for live streaming is complete then you are free to end the live video anytime over facebook page. The video will be automatically added to your Live video library and you can find it their anytime in future.
Step 5: This is all about how to live stream your videos over facebook directly from your computer. Hope you will enjoy streaming a new impressive video soon!
Video tutorial
Facebook stream parameter requirements
- 1. You need to adjust resolution for videos as 720p or simple 1280x720 and the frame rate must be maintained to 30fps. Or simple, one key frame within every two seconds.
- 2. It is important to transfer at least one key frame within every two seconds throught the whole streaming process.
- 3. Professionals recommend bit rate of 4000 Kbps for better results.
- 4. Maximum length supported for a live stream video is 4 hours. After every 240 hours, I is necessary to generate a fresh key frame.
- 5. The audio sample rate is required to be managed at 44.1 KHz.
- 6. Desired Audio Bit rate is 128 Kbps for stereo input.
- 7. The encoding bit rate must be kept as CBR in order to get best results.
Richard Bennett
Richard Bennett is a writer and a lover of all things video.
Follow @Richard Bennett
Richard Bennett
Mar 27, 2024• Proven solutions
Here is the step by step guide to go live from PC to facebook with OBS
If you are using wirecast check this article >>
- Part1.Setting the OBS Scenes
- Part2.Stream setting according to Facebook
- Part3.Preview and Test your before go live
- Part4.Video tutorial

A. Setting the OBS Scenes
Step 1: Make your scenes perfectly ready before starting the actual streaming process.
Step 2: Now you need to add sources to the scenes.
Step 3: It is possible to include windows capture, audio input and webcam as per need.
Step 4: Prefer to use default settings for source and then press OK.

Step 5: Once you have done settings for all sources then they must be adjusted on screen in right order.
Step 6: You also need to arrange the capture size for your videos. Adjust the right video size.
B. Stream setting according to Facebook
Once you are done with Part A then it is time to follow the guidelines as below:
Step 1: First of all you need to go to the settings.
Step 2: Now adjust the bit rate, it must be kept below 4000 Kbps and then choose your preferred recording format.
Step 3: Make settings for resolution as well as FPS. The desired maximum resolution level is 720p or 1280x720 whereas frame rate must be kept at 30 fps.
Step 4: Now you need to visit the facebook page and then click on the video, go to publishing tools and then from top right corner hit +Live option.
Step 5: It is time to move to the ‘create live video’ page. You have to copy the stream key from the specified location. Prefer to keep this page open.
Step 6: Now come back to your OBS settings page and choose stream option. From list of services, prefer to choose Facebook Live option and then simply paste the stream key in the specified field on your screen.
C. Preview and Test your before go live
Step 1: It is time to hit the button “Start Streaming”.
Step 2: Now move back to your facebook page and then choose to preview.

Step 3: It is time to add your title as per preferences, make selection for your targeted audience and once you have finished all settings and testing process then hit button “Go Live”.
Step 4: Once your procedure for live streaming is complete then you are free to end the live video anytime over facebook page. The video will be automatically added to your Live video library and you can find it their anytime in future.
Step 5: This is all about how to live stream your videos over facebook directly from your computer. Hope you will enjoy streaming a new impressive video soon!
Video tutorial
Facebook stream parameter requirements
- 1. You need to adjust resolution for videos as 720p or simple 1280x720 and the frame rate must be maintained to 30fps. Or simple, one key frame within every two seconds.
- 2. It is important to transfer at least one key frame within every two seconds throught the whole streaming process.
- 3. Professionals recommend bit rate of 4000 Kbps for better results.
- 4. Maximum length supported for a live stream video is 4 hours. After every 240 hours, I is necessary to generate a fresh key frame.
- 5. The audio sample rate is required to be managed at 44.1 KHz.
- 6. Desired Audio Bit rate is 128 Kbps for stereo input.
- 7. The encoding bit rate must be kept as CBR in order to get best results.
Richard Bennett
Richard Bennett is a writer and a lover of all things video.
Follow @Richard Bennett
Richard Bennett
Mar 27, 2024• Proven solutions
Here is the step by step guide to go live from PC to facebook with OBS
If you are using wirecast check this article >>
- Part1.Setting the OBS Scenes
- Part2.Stream setting according to Facebook
- Part3.Preview and Test your before go live
- Part4.Video tutorial
A. Setting the OBS Scenes
Step 1: Make your scenes perfectly ready before starting the actual streaming process.
Step 2: Now you need to add sources to the scenes.
Step 3: It is possible to include windows capture, audio input and webcam as per need.
Step 4: Prefer to use default settings for source and then press OK.

Step 5: Once you have done settings for all sources then they must be adjusted on screen in right order.
Step 6: You also need to arrange the capture size for your videos. Adjust the right video size.
B. Stream setting according to Facebook
Once you are done with Part A then it is time to follow the guidelines as below:
Step 1: First of all you need to go to the settings.

Step 2: Now adjust the bit rate, it must be kept below 4000 Kbps and then choose your preferred recording format.
Step 3: Make settings for resolution as well as FPS. The desired maximum resolution level is 720p or 1280x720 whereas frame rate must be kept at 30 fps.
Step 4: Now you need to visit the facebook page and then click on the video, go to publishing tools and then from top right corner hit +Live option.
Step 5: It is time to move to the ‘create live video’ page. You have to copy the stream key from the specified location. Prefer to keep this page open.
Step 6: Now come back to your OBS settings page and choose stream option. From list of services, prefer to choose Facebook Live option and then simply paste the stream key in the specified field on your screen.
C. Preview and Test your before go live
Step 1: It is time to hit the button “Start Streaming”.
Step 2: Now move back to your facebook page and then choose to preview.
Step 3: It is time to add your title as per preferences, make selection for your targeted audience and once you have finished all settings and testing process then hit button “Go Live”.
Step 4: Once your procedure for live streaming is complete then you are free to end the live video anytime over facebook page. The video will be automatically added to your Live video library and you can find it their anytime in future.
Step 5: This is all about how to live stream your videos over facebook directly from your computer. Hope you will enjoy streaming a new impressive video soon!
Video tutorial
Facebook stream parameter requirements
- 1. You need to adjust resolution for videos as 720p or simple 1280x720 and the frame rate must be maintained to 30fps. Or simple, one key frame within every two seconds.
- 2. It is important to transfer at least one key frame within every two seconds throught the whole streaming process.
- 3. Professionals recommend bit rate of 4000 Kbps for better results.
- 4. Maximum length supported for a live stream video is 4 hours. After every 240 hours, I is necessary to generate a fresh key frame.
- 5. The audio sample rate is required to be managed at 44.1 KHz.
- 6. Desired Audio Bit rate is 128 Kbps for stereo input.
- 7. The encoding bit rate must be kept as CBR in order to get best results.
Richard Bennett
Richard Bennett is a writer and a lover of all things video.
Follow @Richard Bennett
Richard Bennett
Mar 27, 2024• Proven solutions
Here is the step by step guide to go live from PC to facebook with OBS
If you are using wirecast check this article >>
- Part1.Setting the OBS Scenes
- Part2.Stream setting according to Facebook
- Part3.Preview and Test your before go live
- Part4.Video tutorial
A. Setting the OBS Scenes
Step 1: Make your scenes perfectly ready before starting the actual streaming process.
Step 2: Now you need to add sources to the scenes.

Step 3: It is possible to include windows capture, audio input and webcam as per need.
Step 4: Prefer to use default settings for source and then press OK.

Step 5: Once you have done settings for all sources then they must be adjusted on screen in right order.
Step 6: You also need to arrange the capture size for your videos. Adjust the right video size.
B. Stream setting according to Facebook
Once you are done with Part A then it is time to follow the guidelines as below:
Step 1: First of all you need to go to the settings.
Step 2: Now adjust the bit rate, it must be kept below 4000 Kbps and then choose your preferred recording format.
Step 3: Make settings for resolution as well as FPS. The desired maximum resolution level is 720p or 1280x720 whereas frame rate must be kept at 30 fps.
Step 4: Now you need to visit the facebook page and then click on the video, go to publishing tools and then from top right corner hit +Live option.
Step 5: It is time to move to the ‘create live video’ page. You have to copy the stream key from the specified location. Prefer to keep this page open.
Step 6: Now come back to your OBS settings page and choose stream option. From list of services, prefer to choose Facebook Live option and then simply paste the stream key in the specified field on your screen.
C. Preview and Test your before go live
Step 1: It is time to hit the button “Start Streaming”.
Step 2: Now move back to your facebook page and then choose to preview.
Step 3: It is time to add your title as per preferences, make selection for your targeted audience and once you have finished all settings and testing process then hit button “Go Live”.
Step 4: Once your procedure for live streaming is complete then you are free to end the live video anytime over facebook page. The video will be automatically added to your Live video library and you can find it their anytime in future.
Step 5: This is all about how to live stream your videos over facebook directly from your computer. Hope you will enjoy streaming a new impressive video soon!
Video tutorial
Facebook stream parameter requirements
- 1. You need to adjust resolution for videos as 720p or simple 1280x720 and the frame rate must be maintained to 30fps. Or simple, one key frame within every two seconds.
- 2. It is important to transfer at least one key frame within every two seconds throught the whole streaming process.
- 3. Professionals recommend bit rate of 4000 Kbps for better results.
- 4. Maximum length supported for a live stream video is 4 hours. After every 240 hours, I is necessary to generate a fresh key frame.
- 5. The audio sample rate is required to be managed at 44.1 KHz.
- 6. Desired Audio Bit rate is 128 Kbps for stereo input.
- 7. The encoding bit rate must be kept as CBR in order to get best results.
Richard Bennett
Richard Bennett is a writer and a lover of all things video.
Follow @Richard Bennett
- Title: [Updated] 2024 Approved How to Capture and Share Your Favorite Pics on Social Platforms with OBS
- Author: Emma
- Created at : 2024-07-18 04:03:47
- Updated at : 2024-07-19 04:03:47
- Link: https://facebook-videos.techidaily.com/updated-2024-approved-how-to-capture-and-share-your-favorite-pics-on-social-platforms-with-obs/
- License: This work is licensed under CC BY-NC-SA 4.0.